SUPPORT
Select Product Type
- All
- Multi Effects
- Skyline
- Amplifier
- Performer
- NeonGlow
- XTOMP
- Controllers
- Omni
- Plugins
- USB Audio Interface
- Accessories
- Nano Legacy
- Press
- Discontinued Products
All
Windows 11 Firmware Update Failure Solution
Important Notice for Windows 11 Users: Firmware Update Connection Issue/ Recommended Firmware Update Solution for Windows 11 Users
We have received feedback from some Windows 11 users regarding device connection or recognition during firmware updates for certain Hotone devices.
In most cases, this can be resolved by switching the device driver to the generic USB Audio Device driver provided by Windows, and then running the firmware update tool again.
This adjustment helps ensure a stable connection during the update process. If you experience difficulty completing a firmware update on Windows 11, we recommend trying this driver setting first before restarting the update.
Solution: Switch to the Generic USB Audio Device Driver
1. Open Device Manager.
· Right-click the Start button, or press Win + X.
· Select Device Manager.
2. Locate your Hotone device.
· Expand Sound, video and game controllers.
· Find the connected Hotone device in the list.
3. Update the driver.
· Right-click the Hotone device.
· Select Update driver.
4. Browse for the driver manually.
· In the pop-up window, select Browse my computer for drivers.
5. Pick the driver from the available list.
· Select Let me pick from a list of available drivers on my computer.
6. Select USB Audio Device.
· Choose USB Audio Device from the list.
· Click Next to complete the driver installation.
· If USB Audio Device does not appear, make sure Show compatible hardware is checked.
7. Restart the firmware update process.
· Close and reopen the Hotone firmware update tool.
· Run the firmware update again.
FAQ
Why does this happen?
Windows 11 may automatically install a dedicated MIDI/audio driver for the device. In some cases, the firmware update tool requires the device to operate through the generic USB audio driver in order to communicate correctly during the update process.
What should I do if I cannot find my Hotone device in Device Manager?
Please make sure the device is securely connected to your computer via USB and powered on. If it still does not appear, try another USB cable or USB port, then click Scan for hardware changes in Device Manager.
Does this apply to all Hotone devices?
The exact device name shown in Windows may vary by product, but the troubleshooting method is the same for Hotone devices that encounter this Windows 11 firmware update connection issue.
If the firmware update still cannot be completed after following these steps, please contact Hotone Support with your product model, Windows version, firmware update tool version, and a brief description of the issue.
Using Audio Interface and FAQ
Ampero and Ampero One come with their own audio interface capabilities, which means you can use them to record directly to your computer and more. So how do you use the Ampero series audio interface function correctly? How do you set up and connect your pedal, instrument, and computer software properly? The answer is as follows:
Follow these steps test the audio interface function of the Ampero Series:
1. Make sure that listeningdevices such asspeakers/headphones are connected to Ampero
2. Check that Ampero's volume knob/instrument volume knob is on
3. Check that Ampero's latest audio interface driver is installed,and connect Ampero directlyto the USB port on your computer (if it's a desktop, connect to the USB behind the encasement).
4. Do not connect to your computer via USB hub (or splitter), and try not to use extension cables.
5. Make sure to use the original USB cable supplied with the unit.
6. Make sure that the audio hardware of your computer/playback software/audio editing software (DAW) is set up as Ampero. For PC users, select the HOTONE AUDIO USB Audio Device driver (i.e. the ASIO driver officially available from Hotone) when setting up the DAW.
7. Make sure that the hardware input and output settings for your computer/playback software/audio editing software (DAW) correspond to Ampero one-to-one.
8. Make sure that the input and output settings on the track you are using in the Audio Editing Software (DAW) correspond to Ampero one-to-one
If it still doesn't work, try a different USB port, USB cable, or another computer.
FAQ
1. The computer does not recognize the Ampero device, the audio interface function does not function, and the Ampero Editor does not recognize the hardware.
Step 1: Connect Ampero to your computer, then turn on Device Manager and select the Sound,Audio Devices, and Game Controller sub-options.
Step 2: Find all the devices associated with Ampero and uninstall the device drivers for all the devices involved.
Step 3: Uninstall all Hotone drivers.
Step 4: Disconnect Ampero from your computer and restart your computer (restartingis not necessary, but it is recommended).
Step 5: Reinstall the latest version of the Hotone ASIO driver (from the official website). It is important not to connect Ampero to your computer yet.
Step 6: After the drive installation is complete, connect Ampero to your computer to see if the problem is resolved.
If it's still not resolved, try using a different USB port on the same computer or try another computer.
2. The recording signal is too low.
You can adjust the recording volume option on Ampero or on Ampero Editor by adjusting the recording volume option, or you can increase the preset volume appropriately to further increase the recording volume. Be careful not to overload the signal by making the recording level too high.
3. You hear two sounds when you turn on the listening function on the Audio Editing Software (DAW) channel.
This is due to the sound (faster) and the sound (slower) overlay that Ampero sends back to itself. To avoid this problem and increase the accuracy of your recording, we recommend that you turn off listening on the channel and listen directly to the sound (i.e.hardware listening) from Ampero itself.
4. Using Ampero as an audio interface, the monitor listening volume cannot be directly adjusted in the system.
In order to ensure optimal cross-platform compatibility, we have disabled the system volume adjustment function. We recommend that you adjust the listening volume option on Ampero or in Ampero Editor by selecting Global Settings - USB Audio. If you are a PC user, you can also adjust the listening volume by opening the console in the software driver.
5. Some systems are not available for Ampero drivers after an update.
Please contact us if this happens so we can track your situation. If the issue is caused by a compatibility change due to a system upgrade, we will introduce an upgrade patch as soon as possible to help you resolve the issue.
How many watts does the Nano Legacy Amplifier have?
5 watts.
Will the Skyline Tuner work for bass?
Tuner works great on bass!
How does the "Sense" knob work on the Gate Pedal?
The "sense" knob on the Gate Pedal acts as a threshold. The sound is cut to 0dB when turned to the max, with no effect when turned to min.
The best way to use it is to adjust based on what you hear--cutting the noise with the least affect on your tone.
Can you tell me if Komp is suitable for bass guitar?
Yes, it sounds awesome on bass. Check out what our bass playing artists have to say about Komp on our website.
What is the voltage of the Soul Press pedal?
The working voltage of Soul Press pedal is 9 volts.
Why 9-18V DC input on Ampero II Stomp?
Ampero II Stomp is designed to suit a wide range of usage scenarios including using with other pedals in a pedal matrix, which is mostly supplied by 9V DC power supply units. So we designed Ampero II Stomp with a wide 9-18V DC input range for better compatibility.
Please note that Ampero II Stomp has a fairly high power requirement (800mA minimum current draw @9V DC). To avoid unit malfunction and electric interference caused by unstable, low quality power supply unit / daisy chain power cord connection, we recommend to use high quality isolated power supply for powering up Ampero II Stomp.
User account
If you are new to Hotone's product, you can always register as a new users. If you have used Hotone's other products such as XTOMP or VSTOMP, you can just use the same account for XTOMP or VSTOMP to log in. In this way you can just use one account to access all the services of Hotone.
Using Audio Interface and FAQ
Ampero and Ampero One come with their own audio interface capabilities, which means you can use them to record directly to your computer and more. So how do you use the Ampero series audio interface function correctly? How do you set up and connect your pedal, instrument, and computer software properly? The answer is as follows:
Follow these steps test the audio interface function of the Ampero Series:
1. Make sure that listeningdevices such asspeakers/headphones are connected to Ampero
2. Check that Ampero's volume knob/instrument volume knob is on
3. Check that Ampero's latest audio interface driver is installed,and connect Ampero directlyto the USB port on your computer (if it's a desktop, connect to the USB behind the encasement).
4. Do not connect to your computer via USB hub (or splitter), and try not to use extension cables.
5. Make sure to use the original USB cable supplied with the unit.
6. Make sure that the audio hardware of your computer/playback software/audio editing software (DAW) is set up as Ampero. For PC users, select the HOTONE AUDIO USB Audio Device driver (i.e. the ASIO driver officially available from Hotone) when setting up the DAW.
7. Make sure that the hardware input and output settings for your computer/playback software/audio editing software (DAW) correspond to Ampero one-to-one.
8. Make sure that the input and output settings on the track you are using in the Audio Editing Software (DAW) correspond to Ampero one-to-one
If it still doesn't work, try a different USB port, USB cable, or another computer.
FAQ
1. The computer does not recognize the Ampero device, the audio interface function does not function, and the Ampero Editor does not recognize the hardware.
Step 1: Connect Ampero to your computer, then turn on Device Manager and select the Sound,Audio Devices, and Game Controller sub-options.
Step 2: Find all the devices associated with Ampero and uninstall the device drivers for all the devices involved.
Step 3: Uninstall all Hotone drivers.
Step 4: Disconnect Ampero from your computer and restart your computer (restartingis not necessary, but it is recommended).
Step 5: Reinstall the latest version of the Hotone ASIO driver (from the official website). It is important not to connect Ampero to your computer yet.
Step 6: After the drive installation is complete, connect Ampero to your computer to see if the problem is resolved.
If it's still not resolved, try using a different USB port on the same computer or try another computer.
2. The recording signal is too low.
You can adjust the recording volume option on Ampero or on Ampero Editor by adjusting the recording volume option, or you can increase the preset volume appropriately to further increase the recording volume. Be careful not to overload the signal by making the recording level too high.
3. You hear two sounds when you turn on the listening function on the Audio Editing Software (DAW) channel.
This is due to the sound (faster) and the sound (slower) overlay that Ampero sends back to itself. To avoid this problem and increase the accuracy of your recording, we recommend that you turn off listening on the channel and listen directly to the sound (i.e.hardware listening) from Ampero itself.
4. Using Ampero as an audio interface, the monitor listening volume cannot be directly adjusted in the system.
In order to ensure optimal cross-platform compatibility, we have disabled the system volume adjustment function. We recommend that you adjust the listening volume option on Ampero or in Ampero Editor by selecting Global Settings - USB Audio. If you are a PC user, you can also adjust the listening volume by opening the console in the software driver.
5. Some systems are not available for Ampero drivers after an update.
Please contact us if this happens so we can track your situation. If the issue is caused by a compatibility change due to a system upgrade, we will introduce an upgrade patch as soon as possible to help you resolve the issue.
What is the voltage of the Soul Press pedal?
The working voltage of Soul Press pedal is 9 volts.
How many watts does the Nano Legacy Amplifier have?
5 watts.
How many watts does the Nano Legacy Amplifier have?
5 watts.
How many watts does the Nano Legacy Amplifier have?
5 watts.
How many watts does the Nano Legacy Amplifier have?
5 watts.
Using Audio Interface and FAQ
Ampero and Ampero One come with their own audio interface capabilities, which means you can use them to record directly to your computer and more. So how do you use the Ampero series audio interface function correctly? How do you set up and connect your pedal, instrument, and computer software properly? The answer is as follows:
Follow these steps test the audio interface function of the Ampero Series:
1. Make sure that listeningdevices such asspeakers/headphones are connected to Ampero
2. Check that Ampero's volume knob/instrument volume knob is on
3. Check that Ampero's latest audio interface driver is installed,and connect Ampero directlyto the USB port on your computer (if it's a desktop, connect to the USB behind the encasement).
4. Do not connect to your computer via USB hub (or splitter), and try not to use extension cables.
5. Make sure to use the original USB cable supplied with the unit.
6. Make sure that the audio hardware of your computer/playback software/audio editing software (DAW) is set up as Ampero. For PC users, select the HOTONE AUDIO USB Audio Device driver (i.e. the ASIO driver officially available from Hotone) when setting up the DAW.
7. Make sure that the hardware input and output settings for your computer/playback software/audio editing software (DAW) correspond to Ampero one-to-one.
8. Make sure that the input and output settings on the track you are using in the Audio Editing Software (DAW) correspond to Ampero one-to-one
If it still doesn't work, try a different USB port, USB cable, or another computer.
FAQ
1. The computer does not recognize the Ampero device, the audio interface function does not function, and the Ampero Editor does not recognize the hardware.
Step 1: Connect Ampero to your computer, then turn on Device Manager and select the Sound,Audio Devices, and Game Controller sub-options.
Step 2: Find all the devices associated with Ampero and uninstall the device drivers for all the devices involved.
Step 3: Uninstall all Hotone drivers.
Step 4: Disconnect Ampero from your computer and restart your computer (restartingis not necessary, but it is recommended).
Step 5: Reinstall the latest version of the Hotone ASIO driver (from the official website). It is important not to connect Ampero to your computer yet.
Step 6: After the drive installation is complete, connect Ampero to your computer to see if the problem is resolved.
If it's still not resolved, try using a different USB port on the same computer or try another computer.
2. The recording signal is too low.
You can adjust the recording volume option on Ampero or on Ampero Editor by adjusting the recording volume option, or you can increase the preset volume appropriately to further increase the recording volume. Be careful not to overload the signal by making the recording level too high.
3. You hear two sounds when you turn on the listening function on the Audio Editing Software (DAW) channel.
This is due to the sound (faster) and the sound (slower) overlay that Ampero sends back to itself. To avoid this problem and increase the accuracy of your recording, we recommend that you turn off listening on the channel and listen directly to the sound (i.e.hardware listening) from Ampero itself.
4. Using Ampero as an audio interface, the monitor listening volume cannot be directly adjusted in the system.
In order to ensure optimal cross-platform compatibility, we have disabled the system volume adjustment function. We recommend that you adjust the listening volume option on Ampero or in Ampero Editor by selecting Global Settings - USB Audio. If you are a PC user, you can also adjust the listening volume by opening the console in the software driver.
5. Some systems are not available for Ampero drivers after an update.
Please contact us if this happens so we can track your situation. If the issue is caused by a compatibility change due to a system upgrade, we will introduce an upgrade patch as soon as possible to help you resolve the issue.
Noise related issues
Noise problems caused by electric currents have long been a headache for many musicians. Noise issues often have complex and common causes, and many times it is normal for a certain amount of undersrance to occur after a device is powered on. The first step is to not panic. As long as the noise causes and the equipment characteristics can be understood, noise can usually be eliminated or reduced to an acceptable degree.
We collected user feedback from a number of platforms and organized a set of noise troubleshooting solutions to help you better use your audio equipment.
Before you start troubleshooting, we recommend that you upgrade your Ampero or Ampero One to the latest firmware, which you can view in your device's Global Settings menu.
As of the time this article was published, the latest firmware version information is:
Ampero Black: V3.7
Ampero Pink: V3.3B
Ampero Blue: V3.3C (factory firmware)
Ampero One: V1.1
The most current firmware releases can be found on the official website: (http://www.hotoneaudio.com/support/2).
Troubleshoot noise issues as follows:
Current noise
Current noise can be caused by the following problems:
1.Guitar electronics
(1)If you are using a single coil electric guitar, it is normal to have current noise unless the single coil pickup is a noiseless pickup.
(2)If you experience loud current noise with a dual coil or noiseless pickup, try placing your hand on the strings and then release your hand (do not touch any metal parts of the body when releasing). Observe whether the hum has changed in both states. If the hum does not change with your hand on or off the strings, the connection is probably good, and there may be a problem with the grounding of your instrument circuit.
(3)If your instrument does not have pickup wiring shielding, or if the cable shielding is not very good, when the instrument is closer to the effects box, you can try to move slightly away from the device or change the direction of the guitar. This should significantly reduce the current noise. This type of noise is caused by external electromagnetic interference.
2.Instrument cables
We strongly recommend that you use high-quality professional instrument cables, as low-quality instrument lines often introduce a large amount of noise that prevents the device from working properly. At the same time, keep your phone and other communication devices as far away from cables, speakers, and effects as possible to prevent or reduce interference.
3.Playing habits
If your instrument, device, and cable are working properly, you will notice a significant decrease or disappearance of current noise when your hand touches the strings or other metal parts. This grounds your device to reduce or eliminate noise. When you are not playing, touch the strings with your hand or turn down the volume knob.
4.Power supply
(1) We recommend that you always use the original power supply. Since third-party power supplies are not optimized for our products, they are likely to introduce current or other noise that will prevent the device from working properly. Ifyou have to use a third-party power supply for some reason, carefully check that the power supply specifications meet the device requirements before use.
If the original power supply is lost, check an instrument or electronics store to buy a replacement.
(2) Since our products use a three-plug power supply, before you use the device, please make sure your power outlet (including wall plugs and power strips) is properly grounded to minimize noise.
(3) If your power environment is supplying multiple devices, try using a power filter/conditioner or reducing the complexity of your power environment to minimize noise. For example, when a colleague once used Ampero and plugged in an electric heater on the same power strip, Ampero's current noise instantly increased. If you experience this problem, be careful notto plug in a large number of unrelated devices to the power outlet where you connect Ampero.
Please also note that:
(1) There has been feedback from users that Ampero has a loud current noise (or even a slight electric shock) when used alone, and that connecting the USB cable to the computer returns to normal because after connecting Ampero to the computer via a USBcable, Ampero becomes grounded via the USB cable (the computer is grounded).
(2) There are times when you experience the opposite: the original is working properly and the current sound of Ampero suddenly increases once connected to the computer, which may be interference with Ampero by the computer USB interface. At this point, try checking your computer. Even if it's a desktop computer that’s grounded, some poorly designed motherboards or computer power supplies can cause noise or even personal safety issues. If it’s a laptop you can try unplugging it to see if that helps.
(3) In some cases you may have toisolate the ground wire of the Ampero power supply; see below for details.
(4) For Ampero One users, if you need to use it frequently in complex power supply environments, we recommend that you purchase a Darkflux mobile power supply to power Ampero One to minimize the possibility of power supply noise.
(5) Effects Chain
In some connection methods, Ampero's underlying noise may increase abnormally if the effects chain is not set up properly. Note the following:
(1) When you connect Ampero totheamp Input jack, you need to turn off Ampero's AMP and CAB modules, otherwise there will be a double AMP plus double CAB. When the undertone from the instrument is amplified multiple times it will result in significant hum, and the tone will not be normal.
(2) When you connect Ampero tothe amp Return jack, you need to turn off Ampero's CAB module (which can be done in Global Settings-Inputand Output) or there will be a double CAB phenomenon, where the undertone from the instrument is amplified multiple times and causes a noticeable hum and abnormal tone.
(3) When you plug Ampero into the amp Aux In jack, you need to confirm that your amp speaker is full-frequency when using the Aux In interface, and if not, you need to turn off Ampero's CAB module (which can be done in Global Settings - Input and Output), otherwise there will be a double CAB. The undertone noiseis obvious because it is amplified multiple times, and the tone is also abnormal.
Fixed frequency noise
Ampero may experience one or more fixed-frequency noises when used with devices such as mixers with their own amplifier, tube speakers, speakers with grounded power supplies, etc., which is generally caused by the ground loop. Ground loop occurs when multiple devices are connected to a common ground via different paths. First, you'll need to verify that the device you're using uses a three-plug power cord and is properly grounded, and if so, you'll need to purchase your own three-plug, two-socket to isolate the ground wires of your Ampero power supply, or isolate the two from each other to eliminate noise from the ground loop.
Intermittent low-frequency hum
This is generally due to the threshold set by the Noise Gate in Ampero presets, which is just above the threshold. This can be adjusted as needed.
Crackling
Sometimes you hear crackling when using some high-powered instruments with Ampero or when some effect parameters are extreme, which is usually caused by an internal signal overload. We'll include input and output level indications in future firmware upgrades to indicate the signal level and whether it's overloaded to help you better adjust your tone.
I am using Purple Wind amp in the US but will go to the United Kingdom where the power supply is 220V instead of the 110V in the US. Can the Purple Wind handle the higher voltage?
The original power adapter of Purple Wind has a voltage range of 100-240v, so it will work fine well in the UK. You may need a plug adapter, however.
Have you tried the Skyline Harmony with bass guitar? What are your thoughts?
The Harmony pedal works great with bass guitar.
Regarding the Soul Press, how many Ohms resistance is it when switched to the Expression pedal setting?
When switched to Expression mode, the the Soul Press resistance is 10k (master potentiometers:10k, trimmer potentiometer:10k).
What kind of controller can I apply to Ampero II Stomp? Can I use the built-in footswitches to control other gears?
Ampero II Stomp features two kinds of controller I/O jacks:
● One 6.35mm TRS EXP/CTRL jack for connecting momentary footswitch controller or expression pedal with TRS output; when connecting an expression pedal, the maximum supported pot resistance is 10kΩ
● A pair of standard 5-pin MIDI IN and OUT/THRU jacks are suitable for regular MIDI controllers; also support transferring MIDI messages coming from the MIDI IN jack
We recommend to use our matched gear:
● Use Ampero Switch as bank switcher, tap tempo + mode switcher, etc.
● Connect our Soul Press / Soul Press II / Ampero Press for instant wah/volume control (please note that the on/off switch on expression pedals cannot be used for switching Ampero II Stomp’s modules’ on/off)
● Connect Ampero Control and combine with Ampero Switch / Soul Press / Soul Press II / Ampero Press for a more expanded, complex unit control
For detailed setting, please refer to corresponding user manual.
Currently sending MIDI messages by tapping Ampero II Stomp's footswitches is not supported; this may be achieved in future firmware updates.
What is a template
A template is just a group of MIDI messages which are dedicated for one single purpose. The app comes with a library of templates for various popular products in the market. For the reason of trademark, we must change the name a little bit for the brands. But smart people like you could just easily figure it out.
As we can't include all the products in the market, you can expand this library by yourself too. One you have edited a group of MIDI message and have verified its function, you can save it as a template. So, the next time you want to recall this function, you don't have to do it from scratch.
Noise related issues
Noise problems caused by electric currents have long been a headache for many musicians. Noise issues often have complex and common causes, and many times it is normal for a certain amount of undersrance to occur after a device is powered on. The first step is to not panic. As long as the noise causes and the equipment characteristics can be understood, noise can usually be eliminated or reduced to an acceptable degree.
We collected user feedback from a number of platforms and organized a set of noise troubleshooting solutions to help you better use your audio equipment.
Before you start troubleshooting, we recommend that you upgrade your Ampero or Ampero One to the latest firmware, which you can view in your device's Global Settings menu.
As of the time this article was published, the latest firmware version information is:
Ampero Black: V3.7
Ampero Pink: V3.3B
Ampero Blue: V3.3C (factory firmware)
Ampero One: V1.1
The most current firmware releases can be found on the official website: (http://www.hotoneaudio.com/support/2).
Troubleshoot noise issues as follows:
Current noise
Current noise can be caused by the following problems:
1.Guitar electronics
(1)If you are using a single coil electric guitar, it is normal to have current noise unless the single coil pickup is a noiseless pickup.
(2)If you experience loud current noise with a dual coil or noiseless pickup, try placing your hand on the strings and then release your hand (do not touch any metal parts of the body when releasing). Observe whether the hum has changed in both states. If the hum does not change with your hand on or off the strings, the connection is probably good, and there may be a problem with the grounding of your instrument circuit.
(3)If your instrument does not have pickup wiring shielding, or if the cable shielding is not very good, when the instrument is closer to the effects box, you can try to move slightly away from the device or change the direction of the guitar. This should significantly reduce the current noise. This type of noise is caused by external electromagnetic interference.
2.Instrument cables
We strongly recommend that you use high-quality professional instrument cables, as low-quality instrument lines often introduce a large amount of noise that prevents the device from working properly. At the same time, keep your phone and other communication devices as far away from cables, speakers, and effects as possible to prevent or reduce interference.
3.Playing habits
If your instrument, device, and cable are working properly, you will notice a significant decrease or disappearance of current noise when your hand touches the strings or other metal parts. This grounds your device to reduce or eliminate noise. When you are not playing, touch the strings with your hand or turn down the volume knob.
4.Power supply
(1) We recommend that you always use the original power supply. Since third-party power supplies are not optimized for our products, they are likely to introduce current or other noise that will prevent the device from working properly. Ifyou have to use a third-party power supply for some reason, carefully check that the power supply specifications meet the device requirements before use.
If the original power supply is lost, check an instrument or electronics store to buy a replacement.
(2) Since our products use a three-plug power supply, before you use the device, please make sure your power outlet (including wall plugs and power strips) is properly grounded to minimize noise.
(3) If your power environment is supplying multiple devices, try using a power filter/conditioner or reducing the complexity of your power environment to minimize noise. For example, when a colleague once used Ampero and plugged in an electric heater on the same power strip, Ampero's current noise instantly increased. If you experience this problem, be careful notto plug in a large number of unrelated devices to the power outlet where you connect Ampero.
Please also note that:
(1) There has been feedback from users that Ampero has a loud current noise (or even a slight electric shock) when used alone, and that connecting the USB cable to the computer returns to normal because after connecting Ampero to the computer via a USBcable, Ampero becomes grounded via the USB cable (the computer is grounded).
(2) There are times when you experience the opposite: the original is working properly and the current sound of Ampero suddenly increases once connected to the computer, which may be interference with Ampero by the computer USB interface. At this point, try checking your computer. Even if it's a desktop computer that’s grounded, some poorly designed motherboards or computer power supplies can cause noise or even personal safety issues. If it’s a laptop you can try unplugging it to see if that helps.
(3) In some cases you may have toisolate the ground wire of the Ampero power supply; see below for details.
(4) For Ampero One users, if you need to use it frequently in complex power supply environments, we recommend that you purchase a Darkflux mobile power supply to power Ampero One to minimize the possibility of power supply noise.
(5) Effects Chain
In some connection methods, Ampero's underlying noise may increase abnormally if the effects chain is not set up properly. Note the following:
(1) When you connect Ampero totheamp Input jack, you need to turn off Ampero's AMP and CAB modules, otherwise there will be a double AMP plus double CAB. When the undertone from the instrument is amplified multiple times it will result in significant hum, and the tone will not be normal.
(2) When you connect Ampero tothe amp Return jack, you need to turn off Ampero's CAB module (which can be done in Global Settings-Inputand Output) or there will be a double CAB phenomenon, where the undertone from the instrument is amplified multiple times and causes a noticeable hum and abnormal tone.
(3) When you plug Ampero into the amp Aux In jack, you need to confirm that your amp speaker is full-frequency when using the Aux In interface, and if not, you need to turn off Ampero's CAB module (which can be done in Global Settings - Input and Output), otherwise there will be a double CAB. The undertone noiseis obvious because it is amplified multiple times, and the tone is also abnormal.
Fixed frequency noise
Ampero may experience one or more fixed-frequency noises when used with devices such as mixers with their own amplifier, tube speakers, speakers with grounded power supplies, etc., which is generally caused by the ground loop. Ground loop occurs when multiple devices are connected to a common ground via different paths. First, you'll need to verify that the device you're using uses a three-plug power cord and is properly grounded, and if so, you'll need to purchase your own three-plug, two-socket to isolate the ground wires of your Ampero power supply, or isolate the two from each other to eliminate noise from the ground loop.
Intermittent low-frequency hum
This is generally due to the threshold set by the Noise Gate in Ampero presets, which is just above the threshold. This can be adjusted as needed.
Crackling
Sometimes you hear crackling when using some high-powered instruments with Ampero or when some effect parameters are extreme, which is usually caused by an internal signal overload. We'll include input and output level indications in future firmware upgrades to indicate the signal level and whether it's overloaded to help you better adjust your tone.
Regarding the Soul Press, how many Ohms resistance is it when switched to the Expression pedal setting?
When switched to Expression mode, the the Soul Press resistance is 10k (master potentiometers:10k, trimmer potentiometer:10k).
I am using Purple Wind amp in the US but will go to the United Kingdom where the power supply is 220V instead of the 110V in the US. Can the Purple Wind handle the higher voltage?
The original power adapter of Purple Wind has a voltage range of 100-240v, so it will work fine well in the UK. You may need a plug adapter, however.
I am using Purple Wind amp in the US but will go to the United Kingdom where the power supply is 220V instead of the 110V in the US. Can the Purple Wind handle the higher voltage?
The original power adapter of Purple Wind has a voltage range of 100-240v, so it will work fine well in the UK. You may need a plug adapter, however.
I am using Purple Wind amp in the US but will go to the United Kingdom where the power supply is 220V instead of the 110V in the US. Can the Purple Wind handle the higher voltage?
The original power adapter of Purple Wind has a voltage range of 100-240v, so it will work fine well in the UK. You may need a plug adapter, however.
I am using Purple Wind amp in the US but will go to the United Kingdom where the power supply is 220V instead of the 110V in the US. Can the Purple Wind handle the higher voltage?
The original power adapter of Purple Wind has a voltage range of 100-240v, so it will work fine well in the UK. You may need a plug adapter, however.
Noise related issues
Noise problems caused by electric currents have long been a headache for many musicians. Noise issues often have complex and common causes, and many times it is normal for a certain amount of undersrance to occur after a device is powered on. The first step is to not panic. As long as the noise causes and the equipment characteristics can be understood, noise can usually be eliminated or reduced to an acceptable degree.
We collected user feedback from a number of platforms and organized a set of noise troubleshooting solutions to help you better use your audio equipment.
Before you start troubleshooting, we recommend that you upgrade your Ampero or Ampero One to the latest firmware, which you can view in your device's Global Settings menu.
As of the time this article was published, the latest firmware version information is:
Ampero Black: V3.7
Ampero Pink: V3.3B
Ampero Blue: V3.3C (factory firmware)
Ampero One: V1.1
The most current firmware releases can be found on the official website: (http://www.hotoneaudio.com/support/2).
Troubleshoot noise issues as follows:
Current noise
Current noise can be caused by the following problems:
1.Guitar electronics
(1)If you are using a single coil electric guitar, it is normal to have current noise unless the single coil pickup is a noiseless pickup.
(2)If you experience loud current noise with a dual coil or noiseless pickup, try placing your hand on the strings and then release your hand (do not touch any metal parts of the body when releasing). Observe whether the hum has changed in both states. If the hum does not change with your hand on or off the strings, the connection is probably good, and there may be a problem with the grounding of your instrument circuit.
(3)If your instrument does not have pickup wiring shielding, or if the cable shielding is not very good, when the instrument is closer to the effects box, you can try to move slightly away from the device or change the direction of the guitar. This should significantly reduce the current noise. This type of noise is caused by external electromagnetic interference.
2.Instrument cables
We strongly recommend that you use high-quality professional instrument cables, as low-quality instrument lines often introduce a large amount of noise that prevents the device from working properly. At the same time, keep your phone and other communication devices as far away from cables, speakers, and effects as possible to prevent or reduce interference.
3.Playing habits
If your instrument, device, and cable are working properly, you will notice a significant decrease or disappearance of current noise when your hand touches the strings or other metal parts. This grounds your device to reduce or eliminate noise. When you are not playing, touch the strings with your hand or turn down the volume knob.
4.Power supply
(1) We recommend that you always use the original power supply. Since third-party power supplies are not optimized for our products, they are likely to introduce current or other noise that will prevent the device from working properly. Ifyou have to use a third-party power supply for some reason, carefully check that the power supply specifications meet the device requirements before use.
If the original power supply is lost, check an instrument or electronics store to buy a replacement.
(2) Since our products use a three-plug power supply, before you use the device, please make sure your power outlet (including wall plugs and power strips) is properly grounded to minimize noise.
(3) If your power environment is supplying multiple devices, try using a power filter/conditioner or reducing the complexity of your power environment to minimize noise. For example, when a colleague once used Ampero and plugged in an electric heater on the same power strip, Ampero's current noise instantly increased. If you experience this problem, be careful notto plug in a large number of unrelated devices to the power outlet where you connect Ampero.
Please also note that:
(1) There has been feedback from users that Ampero has a loud current noise (or even a slight electric shock) when used alone, and that connecting the USB cable to the computer returns to normal because after connecting Ampero to the computer via a USBcable, Ampero becomes grounded via the USB cable (the computer is grounded).
(2) There are times when you experience the opposite: the original is working properly and the current sound of Ampero suddenly increases once connected to the computer, which may be interference with Ampero by the computer USB interface. At this point, try checking your computer. Even if it's a desktop computer that’s grounded, some poorly designed motherboards or computer power supplies can cause noise or even personal safety issues. If it’s a laptop you can try unplugging it to see if that helps.
(3) In some cases you may have toisolate the ground wire of the Ampero power supply; see below for details.
(4) For Ampero One users, if you need to use it frequently in complex power supply environments, we recommend that you purchase a Darkflux mobile power supply to power Ampero One to minimize the possibility of power supply noise.
(5) Effects Chain
In some connection methods, Ampero's underlying noise may increase abnormally if the effects chain is not set up properly. Note the following:
(1) When you connect Ampero totheamp Input jack, you need to turn off Ampero's AMP and CAB modules, otherwise there will be a double AMP plus double CAB. When the undertone from the instrument is amplified multiple times it will result in significant hum, and the tone will not be normal.
(2) When you connect Ampero tothe amp Return jack, you need to turn off Ampero's CAB module (which can be done in Global Settings-Inputand Output) or there will be a double CAB phenomenon, where the undertone from the instrument is amplified multiple times and causes a noticeable hum and abnormal tone.
(3) When you plug Ampero into the amp Aux In jack, you need to confirm that your amp speaker is full-frequency when using the Aux In interface, and if not, you need to turn off Ampero's CAB module (which can be done in Global Settings - Input and Output), otherwise there will be a double CAB. The undertone noiseis obvious because it is amplified multiple times, and the tone is also abnormal.
Fixed frequency noise
Ampero may experience one or more fixed-frequency noises when used with devices such as mixers with their own amplifier, tube speakers, speakers with grounded power supplies, etc., which is generally caused by the ground loop. Ground loop occurs when multiple devices are connected to a common ground via different paths. First, you'll need to verify that the device you're using uses a three-plug power cord and is properly grounded, and if so, you'll need to purchase your own three-plug, two-socket to isolate the ground wires of your Ampero power supply, or isolate the two from each other to eliminate noise from the ground loop.
Intermittent low-frequency hum
This is generally due to the threshold set by the Noise Gate in Ampero presets, which is just above the threshold. This can be adjusted as needed.
Crackling
Sometimes you hear crackling when using some high-powered instruments with Ampero or when some effect parameters are extreme, which is usually caused by an internal signal overload. We'll include input and output level indications in future firmware upgrades to indicate the signal level and whether it's overloaded to help you better adjust your tone.
I wish Ampero and Ampero One had more footswitches
Try using Ampero with Ampero Switch to unlock more features. Alternatively, for Ampero, you can externally connect midi controllers to expand your options. You can learn more about Ampero Switch by clicking on the link below: https://www.hotoneaudio.com/products/controlers/Ampero-switch
Can I use your Nano Legacy amps on stage? If I don't have a cab, would it be OK to connect it directly to the mixer by connecting a DI through the output?
Yes, the Nano Legacy amps works great connected directly to a mixer through the line out.
Are the Skyline pedals cases made of metal?
Yes, they are made of a heavy Zinc alloy.
What about Volume mode?
In volume mode, the pedal is high impedance and must be powered. It keeps your tone working as an active pedal.
What benefits can I have with Ampero II Stomp’s 8x8 USB audio interface?
The multi I/O USB audio interface of Ampero II Stomp brings you more possibilities when recording/mixing/monitoring/mastering your music compositions including:
● Set chain A/B to fully parallel, add different effects – recording with two different tones
● Record two instruments at the same time
● Record dry and wet signal at the same time
● Reamp
● … and more!
You can also have some alternative usages like:
● Use FX Loop Return jack as an aux input for recording from other devices
● Use FX Loop Send jack as an aux output for separate monitoring
● Go streaming or online teaching with broadcaster app (e.g. OBS)
● … and more!
We'll give more features for optimizing the USB audio function like higher sampling rate and loopback function so that you can explore much more.
Do I need to always connect my mobile phone to use it?
Once you are done with all the editing and have saved the presets to your Ampero Control, you can just use it without your mobile phone. All the contents are stored inside the device and all you need to do is to power it up.
I wish Ampero and Ampero One had more footswitches
Try using Ampero with Ampero Switch to unlock more features. Alternatively, for Ampero, you can externally connect midi controllers to expand your options. You can learn more about Ampero Switch by clicking on the link below: https://www.hotoneaudio.com/products/controlers/Ampero-switch
What about Volume mode?
In volume mode, the pedal is high impedance and must be powered. It keeps your tone working as an active pedal.
Can I use your Nano Legacy amps on stage? If I don't have a cab, would it be OK to connect it directly to the mixer by connecting a DI through the output?
Yes, the Nano Legacy amps works great connected directly to a mixer through the line out.
Can I use your Nano Legacy amps on stage? If I don't have a cab, would it be OK to connect it directly to the mixer by connecting a DI through the output?
Yes, the Nano Legacy amps works great connected directly to a mixer through the line out.
Can I use your Nano Legacy amps on stage? If I don't have a cab, would it be OK to connect it directly to the mixer by connecting a DI through the output?
Yes, the Nano Legacy amps works great connected directly to a mixer through the line out.
Can I use your Nano Legacy amps on stage? If I don't have a cab, would it be OK to connect it directly to the mixer by connecting a DI through the output?
Yes, the Nano Legacy amps works great connected directly to a mixer through the line out.
I wish Ampero and Ampero One had more footswitches
Try using Ampero with Ampero Switch to unlock more features. Alternatively, for Ampero, you can externally connect midi controllers to expand your options. You can learn more about Ampero Switch by clicking on the link below: https://www.hotoneaudio.com/products/controlers/Ampero-switch
What are the power requirements for Ampero, and Ampero One? If my original power supply is accidentally lost, how do I choose the right power supply?
We recommend that you always use the original power supply. Third-party power supplies are not designed for our products any may introduce current noise or other noise, resulting in the device is not working properly.
If you have to use a third-party power supply for some reason, choose a power supply based on your device that meets the following specifications:
Ampero: DC 18V internal and external positive power supply, output current needs to be greater than 500mA, AC end plug requires ground connector; DC end plug size: 5.5mm X 2.1mm
Ampero One: DC 9V internal and external positive power supply with output current greater than 500mA and DC end plug size: 5.5mm X 2.1mm
As a mini amplifier, could the Nano Legacy Amplifier work with large cabinets?
Yes, Hotone Nano Legacy series Amplifier has adaptive impedance matching from 4 Ohm to 16 Ohm cabinets, with an output power of 5 watts.
Can the Skyline Tuner be powered with 18V?
Skyline tuner CAN NOT work with an 18v power supply. The internal circuit would be destroyed under over high voltage. Please use a standard 9v power supply.
When I’m using Ampero II Stomp as an audio interface, how can I record backing track and my instruments at the same time?
The Aux In input of Ampero II Stomp will not be processed, but you can use FX Loop Return jack instead by following the steps below:
1. Connect your Ampero II Stomp to your computer as an audio interface.
2. Launch a DAW and set Ampero II Stomp as the main audio device.
3. Create an audio track (track A) with stereo input, set input channel to 1-2 for recording instruments.
4. Create an audio track (track B) with stereo input, set input channel to 5-6 for recording external backing track.
5. Connect backing track player to Ampero II Stomp with an aux cable (audio jack adapters may be needed depending on your cable).
6. Record both track A and B to record your instruments and backing track at the same time.
If you want to get a mixed track instead of separated tracks, please follow the steps below:
1. Connect your Ampero II Stomp to your computer as an audio interface.
2. Launch a DAW and set Ampero II Stomp as the main audio device.
3. Create an audio track with stereo input, set input channel to 1-2 for recording.
4. Add an FX RTN module in the current patch, keep all settings as default; this module should be added to the VERY END of your effect chain (before output node A).
5. Connect backing track player to Ampero II Stomp with an aux cable (audio jack adapters may be needed depending on your cable).
6. Record the audio track you created to get an audio clip mixing instrument and backing track.
What is Test?
You must have noticed the button Test in the editing page. What the “Test” button let you do is to ask the Ampero Control to send out the current group of message you are editing. The messages are not stored and the preset is not modified. This will allow you to verify the messages before you actually store it.
What are the power requirements for Ampero, and Ampero One? If my original power supply is accidentally lost, how do I choose the right power supply?
We recommend that you always use the original power supply. Third-party power supplies are not designed for our products any may introduce current noise or other noise, resulting in the device is not working properly.
If you have to use a third-party power supply for some reason, choose a power supply based on your device that meets the following specifications:
Ampero: DC 18V internal and external positive power supply, output current needs to be greater than 500mA, AC end plug requires ground connector; DC end plug size: 5.5mm X 2.1mm
Ampero One: DC 9V internal and external positive power supply with output current greater than 500mA and DC end plug size: 5.5mm X 2.1mm
As a mini amplifier, could the Nano Legacy Amplifier work with large cabinets?
Yes, Hotone Nano Legacy series Amplifier has adaptive impedance matching from 4 Ohm to 16 Ohm cabinets, with an output power of 5 watts.
As a mini amplifier, could the Nano Legacy Amplifier work with large cabinets?
Yes, Hotone Nano Legacy series Amplifier has adaptive impedance matching from 4 Ohm to 16 Ohm cabinets, with an output power of 5 watts.
As a mini amplifier, could the Nano Legacy Amplifier work with large cabinets?
Yes, Hotone Nano Legacy series Amplifier has adaptive impedance matching from 4 Ohm to 16 Ohm cabinets, with an output power of 5 watts.
As a mini amplifier, could the Nano Legacy Amplifier work with large cabinets?
Yes, Hotone Nano Legacy series Amplifier has adaptive impedance matching from 4 Ohm to 16 Ohm cabinets, with an output power of 5 watts.
As a mini amplifier, could the Nano Legacy Amplifier work with large cabinets?
Yes, Hotone Nano Legacy series Amplifier has adaptive impedance matching from 4 Ohm to 16 Ohm cabinets, with an output power of 5 watts.
What are the power requirements for Ampero, and Ampero One? If my original power supply is accidentally lost, how do I choose the right power supply?
We recommend that you always use the original power supply. Third-party power supplies are not designed for our products any may introduce current noise or other noise, resulting in the device is not working properly.
If you have to use a third-party power supply for some reason, choose a power supply based on your device that meets the following specifications:
Ampero: DC 18V internal and external positive power supply, output current needs to be greater than 500mA, AC end plug requires ground connector; DC end plug size: 5.5mm X 2.1mm
Ampero One: DC 9V internal and external positive power supply with output current greater than 500mA and DC end plug size: 5.5mm X 2.1mm
How do I download the latest version of firmware and software?
First, please visit the support page of Hotone's official website: (https://www.hotoneaudio.com/support/1):
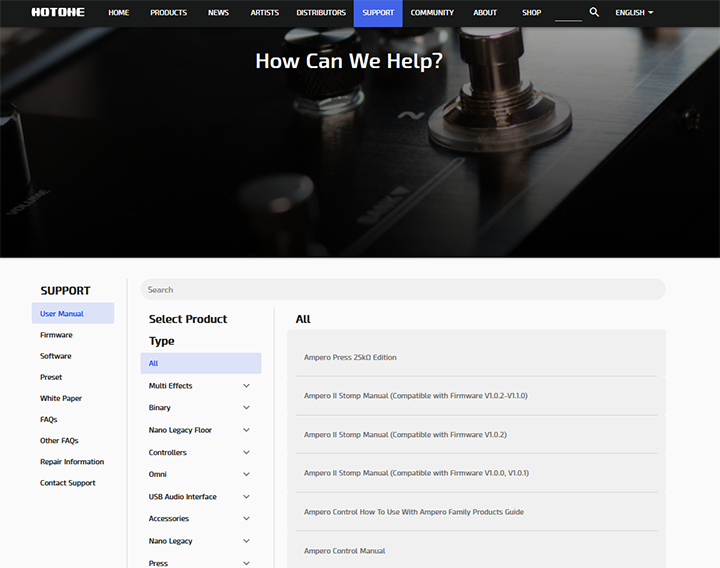
Then, find the firmware or software options in the left column. When you click on it, the right column will display the available updates:

You can type keywords to search, or you can manually select product categories (multieffects) and product names (Ampero or Ampero One; note that Ampero has several different versions) to filter the firmware or software you need.
The higher the number of the version, the newer the software/firmware.
On the Mojo Diamond amp the line/headphones out on the back is listed on the specs as a stereo mini jack. Will it be damaged if I use a mono jack instead, to connect it to the mono line-in of outboard gear or power-amps or mixers?
It's fine to connect the line/headphones output with a mono jack.
How to use the MIDI IN socket
First of all, the MIDI OUT socket on Ampero Control is also a MIDI Thru socket. The MIDI messages that Ampero Control receives from either MIDI IN, Bluetooth MIDI or USB MIDI will be forwarded to the MIDI OUT socket. So there are two major reasons that you would use the MIDI IN socket.
The first one is to connect multiple Ampero Control together so you can have more than 4 footswitches. Just connect Ampero Control in a daisy chain style by plugging MIDI cable between MIDI IN socket on one device to MIDI OUT socket on another one.
The second one is to allow you to put Ampero Control in the middle of your MIDI message chain instead of only at the beginning of the message chain.
How do I download the latest version of firmware and software?
First, please visit the support page of Hotone's official website: (https://www.hotoneaudio.com/support/1):
Then, find the firmware or software options in the left column. When you click on it, the right column will display the available updates:
You can type keywords to search, or you can manually select product categories (multieffects) and product names (Ampero or Ampero One; note that Ampero has several different versions) to filter the firmware or software you need.
The higher the number of the version, the newer the software/firmware.
On the Mojo Diamond amp the line/headphones out on the back is listed on the specs as a stereo mini jack. Will it be damaged if I use a mono jack instead, to connect it to the mono line-in of outboard gear or power-amps or mixers?
It's fine to connect the line/headphones output with a mono jack.
On the Mojo Diamond amp the line/headphones out on the back is listed on the specs as a stereo mini jack. Will it be damaged if I use a mono jack instead, to connect it to the mono line-in of outboard gear or power-amps or mixers?
It's fine to connect the line/headphones output with a mono jack.
On the Mojo Diamond amp the line/headphones out on the back is listed on the specs as a stereo mini jack. Will it be damaged if I use a mono jack instead, to connect it to the mono line-in of outboard gear or power-amps or mixers?
It's fine to connect the line/headphones output with a mono jack.
On the Mojo Diamond amp the line/headphones out on the back is listed on the specs as a stereo mini jack. Will it be damaged if I use a mono jack instead, to connect it to the mono line-in of outboard gear or power-amps or mixers?
It's fine to connect the line/headphones output with a mono jack.
How do I download the latest version of firmware and software?
First, please visit the support page of Hotone's official website: (https://www.hotoneaudio.com/support/1):
Then, find the firmware or software options in the left column. When you click on it, the right column will display the available updates:
You can type keywords to search, or you can manually select product categories (multieffects) and product names (Ampero or Ampero One; note that Ampero has several different versions) to filter the firmware or software you need.
The higher the number of the version, the newer the software/firmware.
What happens to the IRs of Ampero and Ampero One?
Ampero, like Ampero One, supports 1024 IR sampling, which is approximately 23ms in length. That is, no matter how long the user's IR file is, Ampero will only take the first 23ms of content, and if the user's IR file length is less than this value, it will be processed at the actual length.
What are the power requirements for the Nano Legacy amps? And how much current do they draw?
The Nano Legacy amps works with 18V with a maximum output current of 900mA (at 18V 4Ohm).
Can I send MIDI messages to Ampero Control through USB and Bluetooth?
Yes you can send MIDI messages to Ampero Control either through USB MIDI and Bluetooth MIDI. All the received messages will be sent out untouched through MIDI OUT socket.
What happens to the IRs of Ampero and Ampero One?
Ampero, like Ampero One, supports 1024 IR sampling, which is approximately 23ms in length. That is, no matter how long the user's IR file is, Ampero will only take the first 23ms of content, and if the user's IR file length is less than this value, it will be processed at the actual length.
What are the power requirements for the Nano Legacy amps? And how much current do they draw?
The Nano Legacy amps works with 18V with a maximum output current of 900mA (at 18V 4Ohm).
What are the power requirements for the Nano Legacy amps? And how much current do they draw?
The Nano Legacy amps works with 18V with a maximum output current of 900mA (at 18V 4Ohm).
What are the power requirements for the Nano Legacy amps? And how much current do they draw?
The Nano Legacy amps works with 18V with a maximum output current of 900mA (at 18V 4Ohm).
What are the power requirements for the Nano Legacy amps? And how much current do they draw?
The Nano Legacy amps works with 18V with a maximum output current of 900mA (at 18V 4Ohm).
What happens to the IRs of Ampero and Ampero One?
Ampero, like Ampero One, supports 1024 IR sampling, which is approximately 23ms in length. That is, no matter how long the user's IR file is, Ampero will only take the first 23ms of content, and if the user's IR file length is less than this value, it will be processed at the actual length.
Why do the effects parameters I'm using jump around without me changing them?
Check in the control settings interface whether the effect parameters moving around are controlled by the built-in or external expression pedal. If you do not need the parameters to be controlled by the expression pedal, they can be cleared from the control items linked to the expression pedal.
In addition, if you use a built-in or external expression pedal to control a parameter, when your pedal stays in the middle tread position, the controlled parameters may move within a very small range, because the host may detect slight changes in pedal travel, which is normal. If it’s influenced by the beat, for example, the movement range depends on the pedal's angle or pedal electronics accuracy.
Can the Nano Legacy series be run without a speaker (using the headphone out to a speaker emulator box then to the PA).
The Nano Legacy heads don't need a speaker load to function, so you can certainly just use it with headphones. They also work great directly through an interface for computer recording.
Why do the effects parameters I'm using jump around without me changing them?
Check in the control settings interface whether the effect parameters moving around are controlled by the built-in or external expression pedal. If you do not need the parameters to be controlled by the expression pedal, they can be cleared from the control items linked to the expression pedal.
In addition, if you use a built-in or external expression pedal to control a parameter, when your pedal stays in the middle tread position, the controlled parameters may move within a very small range, because the host may detect slight changes in pedal travel, which is normal. If it’s influenced by the beat, for example, the movement range depends on the pedal's angle or pedal electronics accuracy.
Can the Nano Legacy series be run without a speaker (using the headphone out to a speaker emulator box then to the PA).
The Nano Legacy heads don't need a speaker load to function, so you can certainly just use it with headphones. They also work great directly through an interface for computer recording.
Can the Nano Legacy series be run without a speaker (using the headphone out to a speaker emulator box then to the PA).
The Nano Legacy heads don't need a speaker load to function, so you can certainly just use it with headphones. They also work great directly through an interface for computer recording.
Can the Nano Legacy series be run without a speaker (using the headphone out to a speaker emulator box then to the PA).
The Nano Legacy heads don't need a speaker load to function, so you can certainly just use it with headphones. They also work great directly through an interface for computer recording.
Can the Nano Legacy series be run without a speaker (using the headphone out to a speaker emulator box then to the PA).
The Nano Legacy heads don't need a speaker load to function, so you can certainly just use it with headphones. They also work great directly through an interface for computer recording.
Why do the effects parameters I'm using jump around without me changing them?
Check in the control settings interface whether the effect parameters moving around are controlled by the built-in or external expression pedal. If you do not need the parameters to be controlled by the expression pedal, they can be cleared from the control items linked to the expression pedal.
In addition, if you use a built-in or external expression pedal to control a parameter, when your pedal stays in the middle tread position, the controlled parameters may move within a very small range, because the host may detect slight changes in pedal travel, which is normal. If it’s influenced by the beat, for example, the movement range depends on the pedal's angle or pedal electronics accuracy.
How do I make a firmware update?
See the Firmware Update Guide on the official website.
Can you tell me if the effects loop is –10dBV for pedals or +4dBV for rack units?
The Nano Legacy amp FX loop is designed for -10dBV (instrument level). However, because the volume knob (LEVEL) is before the SEND in terms of circuitry, you can increase the SEND out signal a bit by turning up the level. It may not get up to +4dbV, but it should be enough to drive most rack equipment.
How do I make a firmware update?
See the Firmware Update Guide on the official website.
Can you tell me if the effects loop is –10dBV for pedals or +4dBV for rack units?
The Nano Legacy amp FX loop is designed for -10dBV (instrument level). However, because the volume knob (LEVEL) is before the SEND in terms of circuitry, you can increase the SEND out signal a bit by turning up the level. It may not get up to +4dbV, but it should be enough to drive most rack equipment.
Can you tell me if the effects loop is –10dBV for pedals or +4dBV for rack units?
The Nano Legacy amp FX loop is designed for -10dBV (instrument level). However, because the volume knob (LEVEL) is before the SEND in terms of circuitry, you can increase the SEND out signal a bit by turning up the level. It may not get up to +4dbV, but it should be enough to drive most rack equipment.
Can you tell me if the effects loop is –10dBV for pedals or +4dBV for rack units?
The Nano Legacy amp FX loop is designed for -10dBV (instrument level). However, because the volume knob (LEVEL) is before the SEND in terms of circuitry, you can increase the SEND out signal a bit by turning up the level. It may not get up to +4dbV, but it should be enough to drive most rack equipment.
Can you tell me if the effects loop is –10dBV for pedals or +4dBV for rack units?
The Nano Legacy amp FX loop is designed for -10dBV (instrument level). However, because the volume knob (LEVEL) is before the SEND in terms of circuitry, you can increase the SEND out signal a bit by turning up the level. It may not get up to +4dbV, but it should be enough to drive most rack equipment.
How do I make a firmware update?
See the Firmware Update Guide on the official website.
How do I import/export presets on Ampero/Ampero One?
Connect Ampero/Ampero One to your computer, open the Ampero Editor editing software on your PC, click "Import" or "Export" in the upper right corner of the software interface. Files will feature the preset extension suffix, "prst."
After the import is successful, the first preset of User Presets will automatically become the preset you imported, and as you continue to add presets, you will need to select the User Presets column (click on the original preset you want to replace) and then import.
Are these amps solid state or digital?
The amp heads are 100% analog solid state.
How do I import/export presets on Ampero/Ampero One?
Connect Ampero/Ampero One to your computer, open the Ampero Editor editing software on your PC, click "Import" or "Export" in the upper right corner of the software interface. Files will feature the preset extension suffix, "prst."
After the import is successful, the first preset of User Presets will automatically become the preset you imported, and as you continue to add presets, you will need to select the User Presets column (click on the original preset you want to replace) and then import.
Are these amps solid state or digital?
The amp heads are 100% analog solid state.
Are these amps solid state or digital?
The amp heads are 100% analog solid state.
Are these amps solid state or digital?
The amp heads are 100% analog solid state.
Are these amps solid state or digital?
The amp heads are 100% analog solid state.
How do I import/export presets on Ampero/Ampero One?
Connect Ampero/Ampero One to your computer, open the Ampero Editor editing software on your PC, click "Import" or "Export" in the upper right corner of the software interface. Files will feature the preset extension suffix, "prst."
After the import is successful, the first preset of User Presets will automatically become the preset you imported, and as you continue to add presets, you will need to select the User Presets column (click on the original preset you want to replace) and then import.
How do I import a third-party IR file in Ampero/Ampero One?
Connect Ampero/Ampero One to your computer, open the Ampero Editor editing software on your computer, click on the CAB module in the software interface effect chain, click "Import IR Files" next to the effects list, and select an IR file (WAV format) to import.
Ampero/Ampero One provides ten blank IR locations. Remember to not overwrite previously imported IR files when importing new IR files.
The question I have is, can I run a multi effects pedal straight into the F/X return? I want to be able to by-pass the preamp without damaging the unit.
Sure can, that's what the FX loop is for. Remember to turn off the amp modeling on the multi-effects when you're using it with the Nano Legacy amp.
How do I import a third-party IR file in Ampero/Ampero One?
Connect Ampero/Ampero One to your computer, open the Ampero Editor editing software on your computer, click on the CAB module in the software interface effect chain, click "Import IR Files" next to the effects list, and select an IR file (WAV format) to import.
Ampero/Ampero One provides ten blank IR locations. Remember to not overwrite previously imported IR files when importing new IR files.
The question I have is, can I run a multi effects pedal straight into the F/X return? I want to be able to by-pass the preamp without damaging the unit.
Sure can, that's what the FX loop is for. Remember to turn off the amp modeling on the multi-effects when you're using it with the Nano Legacy amp.
The question I have is, can I run a multi effects pedal straight into the F/X return? I want to be able to by-pass the preamp without damaging the unit.
Sure can, that's what the FX loop is for. Remember to turn off the amp modeling on the multi-effects when you're using it with the Nano Legacy amp.
The question I have is, can I run a multi effects pedal straight into the F/X return? I want to be able to by-pass the preamp without damaging the unit.
Sure can, that's what the FX loop is for. Remember to turn off the amp modeling on the multi-effects when you're using it with the Nano Legacy amp.
The question I have is, can I run a multi effects pedal straight into the F/X return? I want to be able to by-pass the preamp without damaging the unit.
Sure can, that's what the FX loop is for. Remember to turn off the amp modeling on the multi-effects when you're using it with the Nano Legacy amp.
How do I import a third-party IR file in Ampero/Ampero One?
Connect Ampero/Ampero One to your computer, open the Ampero Editor editing software on your computer, click on the CAB module in the software interface effect chain, click "Import IR Files" next to the effects list, and select an IR file (WAV format) to import.
Ampero/Ampero One provides ten blank IR locations. Remember to not overwrite previously imported IR files when importing new IR files.
How do I adjust the Ampero/Ampero One pedal?
Consider recalibrating the expression pedal if the effect changes significantly when you use it or when you press the pedal lightly.
Click Control Settings - Expression Pedal 1 Settings – Calibrate, and calibrate as prompted.
The expression pedal 1 is the built-in pedal and expression pedal 2 is the external pedal.
I just bought the British Invasion and the Nano Legacy Cabinet. Just want to know the maximum number of Nano Legacy cabinets that can be hooked up?
The OUTPUT of Nano Legacy Cabinet is designed for connecting another cab in parallel; when you are using 2 Nano Legacy Cabs, the overall impedance will become to 4Ω.
If you can DIY the circuit in series and in parallel simultaneously, as long as the overall impedance is not lower than 4Ω, in theory, you can connect as many extra cabs as as you want.
How do I adjust the Ampero/Ampero One pedal?
Consider recalibrating the expression pedal if the effect changes significantly when you use it or when you press the pedal lightly.
Click Control Settings - Expression Pedal 1 Settings – Calibrate, and calibrate as prompted.
The expression pedal 1 is the built-in pedal and expression pedal 2 is the external pedal.
I just bought the British Invasion and the Nano Legacy Cabinet. Just want to know the maximum number of Nano Legacy cabinets that can be hooked up?
The OUTPUT of Nano Legacy Cabinet is designed for connecting another cab in parallel; when you are using 2 Nano Legacy Cabs, the overall impedance will become to 4Ω.
If you can DIY the circuit in series and in parallel simultaneously, as long as the overall impedance is not lower than 4Ω, in theory, you can connect as many extra cabs as as you want.
I just bought the British Invasion and the Nano Legacy Cabinet. Just want to know the maximum number of Nano Legacy cabinets that can be hooked up?
The OUTPUT of Nano Legacy Cabinet is designed for connecting another cab in parallel; when you are using 2 Nano Legacy Cabs, the overall impedance will become to 4Ω.
If you can DIY the circuit in series and in parallel simultaneously, as long as the overall impedance is not lower than 4Ω, in theory, you can connect as many extra cabs as as you want.
I just bought the British Invasion and the Nano Legacy Cabinet. Just want to know the maximum number of Nano Legacy cabinets that can be hooked up?
The OUTPUT of Nano Legacy Cabinet is designed for connecting another cab in parallel; when you are using 2 Nano Legacy Cabs, the overall impedance will become to 4Ω.
If you can DIY the circuit in series and in parallel simultaneously, as long as the overall impedance is not lower than 4Ω, in theory, you can connect as many extra cabs as as you want.
I just bought the British Invasion and the Nano Legacy Cabinet. Just want to know the maximum number of Nano Legacy cabinets that can be hooked up?
The OUTPUT of Nano Legacy Cabinet is designed for connecting another cab in parallel; when you are using 2 Nano Legacy Cabs, the overall impedance will become to 4Ω.
If you can DIY the circuit in series and in parallel simultaneously, as long as the overall impedance is not lower than 4Ω, in theory, you can connect as many extra cabs as as you want.
How do I adjust the Ampero/Ampero One pedal?
Consider recalibrating the expression pedal if the effect changes significantly when you use it or when you press the pedal lightly.
Click Control Settings - Expression Pedal 1 Settings – Calibrate, and calibrate as prompted.
The expression pedal 1 is the built-in pedal and expression pedal 2 is the external pedal.
How do I use the expression pedal on Ampero/Ampero One?
First, activate the expression pedal (the default is the volume pedal when not activated). Press the pedal hard to enter the expression pedal function.
Second, click Control Settings - Expression Pedal 1 Settings - Control Object, and select the target module, target effect, and target parameters in the parameter bar.
In the case of wah effects, when using the expression pedal as a wah pedal, you first need to add the wah effect to the FX1 or FX2 module of the signal chain and assign the Range parameter to the expression pedal, at which point you can hear the effect by turning on and using the expression pedal.
How do I use the expression pedal on Ampero/Ampero One?
First, activate the expression pedal (the default is the volume pedal when not activated). Press the pedal hard to enter the expression pedal function.
Second, click Control Settings - Expression Pedal 1 Settings - Control Object, and select the target module, target effect, and target parameters in the parameter bar.
In the case of wah effects, when using the expression pedal as a wah pedal, you first need to add the wah effect to the FX1 or FX2 module of the signal chain and assign the Range parameter to the expression pedal, at which point you can hear the effect by turning on and using the expression pedal.
How do I use the expression pedal on Ampero/Ampero One?
First, activate the expression pedal (the default is the volume pedal when not activated). Press the pedal hard to enter the expression pedal function.
Second, click Control Settings - Expression Pedal 1 Settings - Control Object, and select the target module, target effect, and target parameters in the parameter bar.
In the case of wah effects, when using the expression pedal as a wah pedal, you first need to add the wah effect to the FX1 or FX2 module of the signal chain and assign the Range parameter to the expression pedal, at which point you can hear the effect by turning on and using the expression pedal.
How do different instruments connect to Ampero/Ampero One?
Ampero has three input options for different instruments:
1. E.GT: For electric guitar/electric bass
2. A.GT: For acoustic guitar or any acoustic instrument
3. LINE: For keyboard instruments such as electric piano, synths, etc.
Ampero One reduces the instrument input selection switch design, but it has a special input interface with extremely high input impedance (up to 4.7M Ohms), which can handle all kinds of instruments. As a result, Ampero One does not need any input adjustment and can be used with electric guitars, electric bass, and acoustic and keyboard instruments.
How do different instruments connect to Ampero/Ampero One?
Ampero has three input options for different instruments:
1. E.GT: For electric guitar/electric bass
2. A.GT: For acoustic guitar or any acoustic instrument
3. LINE: For keyboard instruments such as electric piano, synths, etc.
Ampero One reduces the instrument input selection switch design, but it has a special input interface with extremely high input impedance (up to 4.7M Ohms), which can handle all kinds of instruments. As a result, Ampero One does not need any input adjustment and can be used with electric guitars, electric bass, and acoustic and keyboard instruments.
How do different instruments connect to Ampero/Ampero One?
Ampero has three input options for different instruments:
1. E.GT: For electric guitar/electric bass
2. A.GT: For acoustic guitar or any acoustic instrument
3. LINE: For keyboard instruments such as electric piano, synths, etc.
Ampero One reduces the instrument input selection switch design, but it has a special input interface with extremely high input impedance (up to 4.7M Ohms), which can handle all kinds of instruments. As a result, Ampero One does not need any input adjustment and can be used with electric guitars, electric bass, and acoustic and keyboard instruments.
When do I need to turn the Cab module on/off for Ampero/Ampero One, and how does No Cab mode turn on?
When you connect Ampero/Ampero One to the amp Input, we recommend that you turn off Ampero's AMP and CAB modules for best results.
We recommend that you turn off Ampero's CAB module to avoid adverse effects to tone when connecting Ampero the amp RETURN jack or the input of a power amp, such as Loudster.
When you connect Ampero/Ampero One to full-frequency audio devices such as mixers, audio interfaces, headphones, etc., we recommend that you turn on Ampero/Ampero One's AMP and CAB modules for best results.
In global settings, you can turn on No Cab so that the cabinet effect remains turned off when you switch presets. Method: Global settings - In/Out - Page-turning – No Cab mode (left/right) - Select Off/On
When you connect only one speaker or produce a mono output signal, we recommend that you prioritize the left channel output interface of Ampero/Ampero One.
When do I need to turn the Cab module on/off for Ampero/Ampero One, and how does No Cab mode turn on?
When you connect Ampero/Ampero One to the amp Input, we recommend that you turn off Ampero's AMP and CAB modules for best results.
We recommend that you turn off Ampero's CAB module to avoid adverse effects to tone when connecting Ampero the amp RETURN jack or the input of a power amp, such as Loudster.
When you connect Ampero/Ampero One to full-frequency audio devices such as mixers, audio interfaces, headphones, etc., we recommend that you turn on Ampero/Ampero One's AMP and CAB modules for best results.
In global settings, you can turn on No Cab so that the cabinet effect remains turned off when you switch presets. Method: Global settings - In/Out - Page-turning – No Cab mode (left/right) - Select Off/On
When you connect only one speaker or produce a mono output signal, we recommend that you prioritize the left channel output interface of Ampero/Ampero One.
When do I need to turn the Cab module on/off for Ampero/Ampero One, and how does No Cab mode turn on?
When you connect Ampero/Ampero One to the amp Input, we recommend that you turn off Ampero's AMP and CAB modules for best results.
We recommend that you turn off Ampero's CAB module to avoid adverse effects to tone when connecting Ampero the amp RETURN jack or the input of a power amp, such as Loudster.
When you connect Ampero/Ampero One to full-frequency audio devices such as mixers, audio interfaces, headphones, etc., we recommend that you turn on Ampero/Ampero One's AMP and CAB modules for best results.
In global settings, you can turn on No Cab so that the cabinet effect remains turned off when you switch presets. Method: Global settings - In/Out - Page-turning – No Cab mode (left/right) - Select Off/On
When you connect only one speaker or produce a mono output signal, we recommend that you prioritize the left channel output interface of Ampero/Ampero One.
How is Global EQ setup?
Global EQ is used to set the overall equalization on Ampero. You can access this in the Global Settings of the Ampero/Ampero One main interface, or in the Ampero Editor editing software (icon is located to the right of the drum machine speed).
Global EQ changes Ampero's overall tone, and the Switch option switches the global EQ on (which is turned off by default). Low frequency/high frequency points and low frequency/high frequency gain are used to set the frequency and gain of the low frequency/high frequency shelf filter. The mid frequency point and mid frequency bandwidth are used to set the midrange frequency point and bandwidth (Q value, range 0.1-10, the larger the number, the narrower the bandwidth). The mi frequency gain is used to set the gain of the MID filter. Volume is used to set the output volume, which ranges from 0-100 (default setting is 50).
All frequency and gain adjustments have the same range:
Frequency adjustment range: 20Hz-999Hz (1Hz per step), -1.0kHz-20.0kHz (0.1kHz per step).
Gain adjustment range: -12dB to +12dB
How is Global EQ setup?
Global EQ is used to set the overall equalization on Ampero. You can access this in the Global Settings of the Ampero/Ampero One main interface, or in the Ampero Editor editing software (icon is located to the right of the drum machine speed).
Global EQ changes Ampero's overall tone, and the Switch option switches the global EQ on (which is turned off by default). Low frequency/high frequency points and low frequency/high frequency gain are used to set the frequency and gain of the low frequency/high frequency shelf filter. The mid frequency point and mid frequency bandwidth are used to set the midrange frequency point and bandwidth (Q value, range 0.1-10, the larger the number, the narrower the bandwidth). The mi frequency gain is used to set the gain of the MID filter. Volume is used to set the output volume, which ranges from 0-100 (default setting is 50).
All frequency and gain adjustments have the same range:
Frequency adjustment range: 20Hz-999Hz (1Hz per step), -1.0kHz-20.0kHz (0.1kHz per step).
Gain adjustment range: -12dB to +12dB
How is Global EQ setup?
Global EQ is used to set the overall equalization on Ampero. You can access this in the Global Settings of the Ampero/Ampero One main interface, or in the Ampero Editor editing software (icon is located to the right of the drum machine speed).
Global EQ changes Ampero's overall tone, and the Switch option switches the global EQ on (which is turned off by default). Low frequency/high frequency points and low frequency/high frequency gain are used to set the frequency and gain of the low frequency/high frequency shelf filter. The mid frequency point and mid frequency bandwidth are used to set the midrange frequency point and bandwidth (Q value, range 0.1-10, the larger the number, the narrower the bandwidth). The mi frequency gain is used to set the gain of the MID filter. Volume is used to set the output volume, which ranges from 0-100 (default setting is 50).
All frequency and gain adjustments have the same range:
Frequency adjustment range: 20Hz-999Hz (1Hz per step), -1.0kHz-20.0kHz (0.1kHz per step).
Gain adjustment range: -12dB to +12dB
How do I record audio using Ampero?
Record audio with your phone: Use an OTG cable to connect your phone to Ampero/Ampero One, turn on recording on your phone, or tap record on your video app.
Record with an external audio interface: Connect the output of Ampero/Ampero One to the input of the external audio interface, turn on your DAW (Pro Tools, StudioOne, etc.) to select an external audio interface in the audio hardware options, and tap Record to record. Using Ampero/Ampero One as the audio interface: Download and install the Hotone USB ASIO driver V5.0.0 from the official website. Connect Ampero/Ampero One to your computer, turn on your DAW, selects "Ampero Audio" in the audio hardware option, and click Record to begin recording.
How do I record audio using Ampero?
Record audio with your phone: Use an OTG cable to connect your phone to Ampero/Ampero One, turn on recording on your phone, or tap record on your video app.
Record with an external audio interface: Connect the output of Ampero/Ampero One to the input of the external audio interface, turn on your DAW (Pro Tools, StudioOne, etc.) to select an external audio interface in the audio hardware options, and tap Record to record. Using Ampero/Ampero One as the audio interface: Download and install the Hotone USB ASIO driver V5.0.0 from the official website. Connect Ampero/Ampero One to your computer, turn on your DAW, selects "Ampero Audio" in the audio hardware option, and click Record to begin recording.
How do I record audio using Ampero?
Record audio with your phone: Use an OTG cable to connect your phone to Ampero/Ampero One, turn on recording on your phone, or tap record on your video app.
Record with an external audio interface: Connect the output of Ampero/Ampero One to the input of the external audio interface, turn on your DAW (Pro Tools, StudioOne, etc.) to select an external audio interface in the audio hardware options, and tap Record to record. Using Ampero/Ampero One as the audio interface: Download and install the Hotone USB ASIO driver V5.0.0 from the official website. Connect Ampero/Ampero One to your computer, turn on your DAW, selects "Ampero Audio" in the audio hardware option, and click Record to begin recording.
SUPPORT
User Manual
Firmware
Software
White Paper
FAQs
Safety Instructions
EU Declaration of Conformity
Other FAQs
Warranty Info
Contact Support
FAQs
All
- All
- Multi Effects
- Skyline
- Amplifier
- Performer
- NeonGlow
- XTOMP
- Controllers
- Omni
- Plugins
- USB Audio Interface
- Accessories
- Nano Legacy
- Press
- Discontinued Products
Windows 11 Firmware Update Failure Solution
Important Notice for Windows 11 Users: Firmware Update Connection Issue/ Recommended Firmware Update Solution for Windows 11 Users
We have received feedback from some Windows 11 users regarding device connection or recognition during firmware updates for certain Hotone devices.
In most cases, this can be resolved by switching the device driver to the generic USB Audio Device driver provided by Windows, and then running the firmware update tool again.
This adjustment helps ensure a stable connection during the update process. If you experience difficulty completing a firmware update on Windows 11, we recommend trying this driver setting first before restarting the update.
Solution: Switch to the Generic USB Audio Device Driver
1. Open Device Manager.
· Right-click the Start button, or press Win + X.
· Select Device Manager.
2. Locate your Hotone device.
· Expand Sound, video and game controllers.
· Find the connected Hotone device in the list.
3. Update the driver.
· Right-click the Hotone device.
· Select Update driver.
4. Browse for the driver manually.
· In the pop-up window, select Browse my computer for drivers.
5. Pick the driver from the available list.
· Select Let me pick from a list of available drivers on my computer.
6. Select USB Audio Device.
· Choose USB Audio Device from the list.
· Click Next to complete the driver installation.
· If USB Audio Device does not appear, make sure Show compatible hardware is checked.
7. Restart the firmware update process.
· Close and reopen the Hotone firmware update tool.
· Run the firmware update again.
FAQ
Why does this happen?
Windows 11 may automatically install a dedicated MIDI/audio driver for the device. In some cases, the firmware update tool requires the device to operate through the generic USB audio driver in order to communicate correctly during the update process.
What should I do if I cannot find my Hotone device in Device Manager?
Please make sure the device is securely connected to your computer via USB and powered on. If it still does not appear, try another USB cable or USB port, then click Scan for hardware changes in Device Manager.
Does this apply to all Hotone devices?
The exact device name shown in Windows may vary by product, but the troubleshooting method is the same for Hotone devices that encounter this Windows 11 firmware update connection issue.
If the firmware update still cannot be completed after following these steps, please contact Hotone Support with your product model, Windows version, firmware update tool version, and a brief description of the issue.
Using Audio Interface and FAQ
Ampero and Ampero One come with their own audio interface capabilities, which means you can use them to record directly to your computer and more. So how do you use the Ampero series audio interface function correctly? How do you set up and connect your pedal, instrument, and computer software properly? The answer is as follows:
Follow these steps test the audio interface function of the Ampero Series:
1. Make sure that listeningdevices such asspeakers/headphones are connected to Ampero
2. Check that Ampero's volume knob/instrument volume knob is on
3. Check that Ampero's latest audio interface driver is installed,and connect Ampero directlyto the USB port on your computer (if it's a desktop, connect to the USB behind the encasement).
4. Do not connect to your computer via USB hub (or splitter), and try not to use extension cables.
5. Make sure to use the original USB cable supplied with the unit.
6. Make sure that the audio hardware of your computer/playback software/audio editing software (DAW) is set up as Ampero. For PC users, select the HOTONE AUDIO USB Audio Device driver (i.e. the ASIO driver officially available from Hotone) when setting up the DAW.
7. Make sure that the hardware input and output settings for your computer/playback software/audio editing software (DAW) correspond to Ampero one-to-one.
8. Make sure that the input and output settings on the track you are using in the Audio Editing Software (DAW) correspond to Ampero one-to-one
If it still doesn't work, try a different USB port, USB cable, or another computer.
FAQ
1. The computer does not recognize the Ampero device, the audio interface function does not function, and the Ampero Editor does not recognize the hardware.
Step 1: Connect Ampero to your computer, then turn on Device Manager and select the Sound,Audio Devices, and Game Controller sub-options.
Step 2: Find all the devices associated with Ampero and uninstall the device drivers for all the devices involved.
Step 3: Uninstall all Hotone drivers.
Step 4: Disconnect Ampero from your computer and restart your computer (restartingis not necessary, but it is recommended).
Step 5: Reinstall the latest version of the Hotone ASIO driver (from the official website). It is important not to connect Ampero to your computer yet.
Step 6: After the drive installation is complete, connect Ampero to your computer to see if the problem is resolved.
If it's still not resolved, try using a different USB port on the same computer or try another computer.
2. The recording signal is too low.
You can adjust the recording volume option on Ampero or on Ampero Editor by adjusting the recording volume option, or you can increase the preset volume appropriately to further increase the recording volume. Be careful not to overload the signal by making the recording level too high.
3. You hear two sounds when you turn on the listening function on the Audio Editing Software (DAW) channel.
This is due to the sound (faster) and the sound (slower) overlay that Ampero sends back to itself. To avoid this problem and increase the accuracy of your recording, we recommend that you turn off listening on the channel and listen directly to the sound (i.e.hardware listening) from Ampero itself.
4. Using Ampero as an audio interface, the monitor listening volume cannot be directly adjusted in the system.
In order to ensure optimal cross-platform compatibility, we have disabled the system volume adjustment function. We recommend that you adjust the listening volume option on Ampero or in Ampero Editor by selecting Global Settings - USB Audio. If you are a PC user, you can also adjust the listening volume by opening the console in the software driver.
5. Some systems are not available for Ampero drivers after an update.
Please contact us if this happens so we can track your situation. If the issue is caused by a compatibility change due to a system upgrade, we will introduce an upgrade patch as soon as possible to help you resolve the issue.
How many watts does the Nano Legacy Amplifier have?
5 watts.
Will the Skyline Tuner work for bass?
Tuner works great on bass!
How does the "Sense" knob work on the Gate Pedal?
The "sense" knob on the Gate Pedal acts as a threshold. The sound is cut to 0dB when turned to the max, with no effect when turned to min.
The best way to use it is to adjust based on what you hear--cutting the noise with the least affect on your tone.
Can you tell me if Komp is suitable for bass guitar?
Yes, it sounds awesome on bass. Check out what our bass playing artists have to say about Komp on our website.
What is the voltage of the Soul Press pedal?
The working voltage of Soul Press pedal is 9 volts.
Why 9-18V DC input on Ampero II Stomp?
Ampero II Stomp is designed to suit a wide range of usage scenarios including using with other pedals in a pedal matrix, which is mostly supplied by 9V DC power supply units. So we designed Ampero II Stomp with a wide 9-18V DC input range for better compatibility.
Please note that Ampero II Stomp has a fairly high power requirement (800mA minimum current draw @9V DC). To avoid unit malfunction and electric interference caused by unstable, low quality power supply unit / daisy chain power cord connection, we recommend to use high quality isolated power supply for powering up Ampero II Stomp.
User account
If you are new to Hotone's product, you can always register as a new users. If you have used Hotone's other products such as XTOMP or VSTOMP, you can just use the same account for XTOMP or VSTOMP to log in. In this way you can just use one account to access all the services of Hotone.
Using Audio Interface and FAQ
Ampero and Ampero One come with their own audio interface capabilities, which means you can use them to record directly to your computer and more. So how do you use the Ampero series audio interface function correctly? How do you set up and connect your pedal, instrument, and computer software properly? The answer is as follows:
Follow these steps test the audio interface function of the Ampero Series:
1. Make sure that listeningdevices such asspeakers/headphones are connected to Ampero
2. Check that Ampero's volume knob/instrument volume knob is on
3. Check that Ampero's latest audio interface driver is installed,and connect Ampero directlyto the USB port on your computer (if it's a desktop, connect to the USB behind the encasement).
4. Do not connect to your computer via USB hub (or splitter), and try not to use extension cables.
5. Make sure to use the original USB cable supplied with the unit.
6. Make sure that the audio hardware of your computer/playback software/audio editing software (DAW) is set up as Ampero. For PC users, select the HOTONE AUDIO USB Audio Device driver (i.e. the ASIO driver officially available from Hotone) when setting up the DAW.
7. Make sure that the hardware input and output settings for your computer/playback software/audio editing software (DAW) correspond to Ampero one-to-one.
8. Make sure that the input and output settings on the track you are using in the Audio Editing Software (DAW) correspond to Ampero one-to-one
If it still doesn't work, try a different USB port, USB cable, or another computer.
FAQ
1. The computer does not recognize the Ampero device, the audio interface function does not function, and the Ampero Editor does not recognize the hardware.
Step 1: Connect Ampero to your computer, then turn on Device Manager and select the Sound,Audio Devices, and Game Controller sub-options.
Step 2: Find all the devices associated with Ampero and uninstall the device drivers for all the devices involved.
Step 3: Uninstall all Hotone drivers.
Step 4: Disconnect Ampero from your computer and restart your computer (restartingis not necessary, but it is recommended).
Step 5: Reinstall the latest version of the Hotone ASIO driver (from the official website). It is important not to connect Ampero to your computer yet.
Step 6: After the drive installation is complete, connect Ampero to your computer to see if the problem is resolved.
If it's still not resolved, try using a different USB port on the same computer or try another computer.
2. The recording signal is too low.
You can adjust the recording volume option on Ampero or on Ampero Editor by adjusting the recording volume option, or you can increase the preset volume appropriately to further increase the recording volume. Be careful not to overload the signal by making the recording level too high.
3. You hear two sounds when you turn on the listening function on the Audio Editing Software (DAW) channel.
This is due to the sound (faster) and the sound (slower) overlay that Ampero sends back to itself. To avoid this problem and increase the accuracy of your recording, we recommend that you turn off listening on the channel and listen directly to the sound (i.e.hardware listening) from Ampero itself.
4. Using Ampero as an audio interface, the monitor listening volume cannot be directly adjusted in the system.
In order to ensure optimal cross-platform compatibility, we have disabled the system volume adjustment function. We recommend that you adjust the listening volume option on Ampero or in Ampero Editor by selecting Global Settings - USB Audio. If you are a PC user, you can also adjust the listening volume by opening the console in the software driver.
5. Some systems are not available for Ampero drivers after an update.
Please contact us if this happens so we can track your situation. If the issue is caused by a compatibility change due to a system upgrade, we will introduce an upgrade patch as soon as possible to help you resolve the issue.
What is the voltage of the Soul Press pedal?
The working voltage of Soul Press pedal is 9 volts.
How many watts does the Nano Legacy Amplifier have?
5 watts.
How many watts does the Nano Legacy Amplifier have?
5 watts.
How many watts does the Nano Legacy Amplifier have?
5 watts.
How many watts does the Nano Legacy Amplifier have?
5 watts.
Using Audio Interface and FAQ
Ampero and Ampero One come with their own audio interface capabilities, which means you can use them to record directly to your computer and more. So how do you use the Ampero series audio interface function correctly? How do you set up and connect your pedal, instrument, and computer software properly? The answer is as follows:
Follow these steps test the audio interface function of the Ampero Series:
1. Make sure that listeningdevices such asspeakers/headphones are connected to Ampero
2. Check that Ampero's volume knob/instrument volume knob is on
3. Check that Ampero's latest audio interface driver is installed,and connect Ampero directlyto the USB port on your computer (if it's a desktop, connect to the USB behind the encasement).
4. Do not connect to your computer via USB hub (or splitter), and try not to use extension cables.
5. Make sure to use the original USB cable supplied with the unit.
6. Make sure that the audio hardware of your computer/playback software/audio editing software (DAW) is set up as Ampero. For PC users, select the HOTONE AUDIO USB Audio Device driver (i.e. the ASIO driver officially available from Hotone) when setting up the DAW.
7. Make sure that the hardware input and output settings for your computer/playback software/audio editing software (DAW) correspond to Ampero one-to-one.
8. Make sure that the input and output settings on the track you are using in the Audio Editing Software (DAW) correspond to Ampero one-to-one
If it still doesn't work, try a different USB port, USB cable, or another computer.
FAQ
1. The computer does not recognize the Ampero device, the audio interface function does not function, and the Ampero Editor does not recognize the hardware.
Step 1: Connect Ampero to your computer, then turn on Device Manager and select the Sound,Audio Devices, and Game Controller sub-options.
Step 2: Find all the devices associated with Ampero and uninstall the device drivers for all the devices involved.
Step 3: Uninstall all Hotone drivers.
Step 4: Disconnect Ampero from your computer and restart your computer (restartingis not necessary, but it is recommended).
Step 5: Reinstall the latest version of the Hotone ASIO driver (from the official website). It is important not to connect Ampero to your computer yet.
Step 6: After the drive installation is complete, connect Ampero to your computer to see if the problem is resolved.
If it's still not resolved, try using a different USB port on the same computer or try another computer.
2. The recording signal is too low.
You can adjust the recording volume option on Ampero or on Ampero Editor by adjusting the recording volume option, or you can increase the preset volume appropriately to further increase the recording volume. Be careful not to overload the signal by making the recording level too high.
3. You hear two sounds when you turn on the listening function on the Audio Editing Software (DAW) channel.
This is due to the sound (faster) and the sound (slower) overlay that Ampero sends back to itself. To avoid this problem and increase the accuracy of your recording, we recommend that you turn off listening on the channel and listen directly to the sound (i.e.hardware listening) from Ampero itself.
4. Using Ampero as an audio interface, the monitor listening volume cannot be directly adjusted in the system.
In order to ensure optimal cross-platform compatibility, we have disabled the system volume adjustment function. We recommend that you adjust the listening volume option on Ampero or in Ampero Editor by selecting Global Settings - USB Audio. If you are a PC user, you can also adjust the listening volume by opening the console in the software driver.
5. Some systems are not available for Ampero drivers after an update.
Please contact us if this happens so we can track your situation. If the issue is caused by a compatibility change due to a system upgrade, we will introduce an upgrade patch as soon as possible to help you resolve the issue.
Noise related issues
Noise problems caused by electric currents have long been a headache for many musicians. Noise issues often have complex and common causes, and many times it is normal for a certain amount of undersrance to occur after a device is powered on. The first step is to not panic. As long as the noise causes and the equipment characteristics can be understood, noise can usually be eliminated or reduced to an acceptable degree.
We collected user feedback from a number of platforms and organized a set of noise troubleshooting solutions to help you better use your audio equipment.
Before you start troubleshooting, we recommend that you upgrade your Ampero or Ampero One to the latest firmware, which you can view in your device's Global Settings menu.
As of the time this article was published, the latest firmware version information is:
Ampero Black: V3.7
Ampero Pink: V3.3B
Ampero Blue: V3.3C (factory firmware)
Ampero One: V1.1
The most current firmware releases can be found on the official website: (http://www.hotoneaudio.com/support/2).
Troubleshoot noise issues as follows:
Current noise
Current noise can be caused by the following problems:
1.Guitar electronics
(1)If you are using a single coil electric guitar, it is normal to have current noise unless the single coil pickup is a noiseless pickup.
(2)If you experience loud current noise with a dual coil or noiseless pickup, try placing your hand on the strings and then release your hand (do not touch any metal parts of the body when releasing). Observe whether the hum has changed in both states. If the hum does not change with your hand on or off the strings, the connection is probably good, and there may be a problem with the grounding of your instrument circuit.
(3)If your instrument does not have pickup wiring shielding, or if the cable shielding is not very good, when the instrument is closer to the effects box, you can try to move slightly away from the device or change the direction of the guitar. This should significantly reduce the current noise. This type of noise is caused by external electromagnetic interference.
2.Instrument cables
We strongly recommend that you use high-quality professional instrument cables, as low-quality instrument lines often introduce a large amount of noise that prevents the device from working properly. At the same time, keep your phone and other communication devices as far away from cables, speakers, and effects as possible to prevent or reduce interference.
3.Playing habits
If your instrument, device, and cable are working properly, you will notice a significant decrease or disappearance of current noise when your hand touches the strings or other metal parts. This grounds your device to reduce or eliminate noise. When you are not playing, touch the strings with your hand or turn down the volume knob.
4.Power supply
(1) We recommend that you always use the original power supply. Since third-party power supplies are not optimized for our products, they are likely to introduce current or other noise that will prevent the device from working properly. Ifyou have to use a third-party power supply for some reason, carefully check that the power supply specifications meet the device requirements before use.
If the original power supply is lost, check an instrument or electronics store to buy a replacement.
(2) Since our products use a three-plug power supply, before you use the device, please make sure your power outlet (including wall plugs and power strips) is properly grounded to minimize noise.
(3) If your power environment is supplying multiple devices, try using a power filter/conditioner or reducing the complexity of your power environment to minimize noise. For example, when a colleague once used Ampero and plugged in an electric heater on the same power strip, Ampero's current noise instantly increased. If you experience this problem, be careful notto plug in a large number of unrelated devices to the power outlet where you connect Ampero.
Please also note that:
(1) There has been feedback from users that Ampero has a loud current noise (or even a slight electric shock) when used alone, and that connecting the USB cable to the computer returns to normal because after connecting Ampero to the computer via a USBcable, Ampero becomes grounded via the USB cable (the computer is grounded).
(2) There are times when you experience the opposite: the original is working properly and the current sound of Ampero suddenly increases once connected to the computer, which may be interference with Ampero by the computer USB interface. At this point, try checking your computer. Even if it's a desktop computer that’s grounded, some poorly designed motherboards or computer power supplies can cause noise or even personal safety issues. If it’s a laptop you can try unplugging it to see if that helps.
(3) In some cases you may have toisolate the ground wire of the Ampero power supply; see below for details.
(4) For Ampero One users, if you need to use it frequently in complex power supply environments, we recommend that you purchase a Darkflux mobile power supply to power Ampero One to minimize the possibility of power supply noise.
(5) Effects Chain
In some connection methods, Ampero's underlying noise may increase abnormally if the effects chain is not set up properly. Note the following:
(1) When you connect Ampero totheamp Input jack, you need to turn off Ampero's AMP and CAB modules, otherwise there will be a double AMP plus double CAB. When the undertone from the instrument is amplified multiple times it will result in significant hum, and the tone will not be normal.
(2) When you connect Ampero tothe amp Return jack, you need to turn off Ampero's CAB module (which can be done in Global Settings-Inputand Output) or there will be a double CAB phenomenon, where the undertone from the instrument is amplified multiple times and causes a noticeable hum and abnormal tone.
(3) When you plug Ampero into the amp Aux In jack, you need to confirm that your amp speaker is full-frequency when using the Aux In interface, and if not, you need to turn off Ampero's CAB module (which can be done in Global Settings - Input and Output), otherwise there will be a double CAB. The undertone noiseis obvious because it is amplified multiple times, and the tone is also abnormal.
Fixed frequency noise
Ampero may experience one or more fixed-frequency noises when used with devices such as mixers with their own amplifier, tube speakers, speakers with grounded power supplies, etc., which is generally caused by the ground loop. Ground loop occurs when multiple devices are connected to a common ground via different paths. First, you'll need to verify that the device you're using uses a three-plug power cord and is properly grounded, and if so, you'll need to purchase your own three-plug, two-socket to isolate the ground wires of your Ampero power supply, or isolate the two from each other to eliminate noise from the ground loop.
Intermittent low-frequency hum
This is generally due to the threshold set by the Noise Gate in Ampero presets, which is just above the threshold. This can be adjusted as needed.
Crackling
Sometimes you hear crackling when using some high-powered instruments with Ampero or when some effect parameters are extreme, which is usually caused by an internal signal overload. We'll include input and output level indications in future firmware upgrades to indicate the signal level and whether it's overloaded to help you better adjust your tone.
I am using Purple Wind amp in the US but will go to the United Kingdom where the power supply is 220V instead of the 110V in the US. Can the Purple Wind handle the higher voltage?
The original power adapter of Purple Wind has a voltage range of 100-240v, so it will work fine well in the UK. You may need a plug adapter, however.
Have you tried the Skyline Harmony with bass guitar? What are your thoughts?
The Harmony pedal works great with bass guitar.
Regarding the Soul Press, how many Ohms resistance is it when switched to the Expression pedal setting?
When switched to Expression mode, the the Soul Press resistance is 10k (master potentiometers:10k, trimmer potentiometer:10k).
What kind of controller can I apply to Ampero II Stomp? Can I use the built-in footswitches to control other gears?
Ampero II Stomp features two kinds of controller I/O jacks:
● One 6.35mm TRS EXP/CTRL jack for connecting momentary footswitch controller or expression pedal with TRS output; when connecting an expression pedal, the maximum supported pot resistance is 10kΩ
● A pair of standard 5-pin MIDI IN and OUT/THRU jacks are suitable for regular MIDI controllers; also support transferring MIDI messages coming from the MIDI IN jack
We recommend to use our matched gear:
● Use Ampero Switch as bank switcher, tap tempo + mode switcher, etc.
● Connect our Soul Press / Soul Press II / Ampero Press for instant wah/volume control (please note that the on/off switch on expression pedals cannot be used for switching Ampero II Stomp’s modules’ on/off)
● Connect Ampero Control and combine with Ampero Switch / Soul Press / Soul Press II / Ampero Press for a more expanded, complex unit control
For detailed setting, please refer to corresponding user manual.
Currently sending MIDI messages by tapping Ampero II Stomp's footswitches is not supported; this may be achieved in future firmware updates.
What is a template
A template is just a group of MIDI messages which are dedicated for one single purpose. The app comes with a library of templates for various popular products in the market. For the reason of trademark, we must change the name a little bit for the brands. But smart people like you could just easily figure it out.
As we can't include all the products in the market, you can expand this library by yourself too. One you have edited a group of MIDI message and have verified its function, you can save it as a template. So, the next time you want to recall this function, you don't have to do it from scratch.
Noise related issues
Noise problems caused by electric currents have long been a headache for many musicians. Noise issues often have complex and common causes, and many times it is normal for a certain amount of undersrance to occur after a device is powered on. The first step is to not panic. As long as the noise causes and the equipment characteristics can be understood, noise can usually be eliminated or reduced to an acceptable degree.
We collected user feedback from a number of platforms and organized a set of noise troubleshooting solutions to help you better use your audio equipment.
Before you start troubleshooting, we recommend that you upgrade your Ampero or Ampero One to the latest firmware, which you can view in your device's Global Settings menu.
As of the time this article was published, the latest firmware version information is:
Ampero Black: V3.7
Ampero Pink: V3.3B
Ampero Blue: V3.3C (factory firmware)
Ampero One: V1.1
The most current firmware releases can be found on the official website: (http://www.hotoneaudio.com/support/2).
Troubleshoot noise issues as follows:
Current noise
Current noise can be caused by the following problems:
1.Guitar electronics
(1)If you are using a single coil electric guitar, it is normal to have current noise unless the single coil pickup is a noiseless pickup.
(2)If you experience loud current noise with a dual coil or noiseless pickup, try placing your hand on the strings and then release your hand (do not touch any metal parts of the body when releasing). Observe whether the hum has changed in both states. If the hum does not change with your hand on or off the strings, the connection is probably good, and there may be a problem with the grounding of your instrument circuit.
(3)If your instrument does not have pickup wiring shielding, or if the cable shielding is not very good, when the instrument is closer to the effects box, you can try to move slightly away from the device or change the direction of the guitar. This should significantly reduce the current noise. This type of noise is caused by external electromagnetic interference.
2.Instrument cables
We strongly recommend that you use high-quality professional instrument cables, as low-quality instrument lines often introduce a large amount of noise that prevents the device from working properly. At the same time, keep your phone and other communication devices as far away from cables, speakers, and effects as possible to prevent or reduce interference.
3.Playing habits
If your instrument, device, and cable are working properly, you will notice a significant decrease or disappearance of current noise when your hand touches the strings or other metal parts. This grounds your device to reduce or eliminate noise. When you are not playing, touch the strings with your hand or turn down the volume knob.
4.Power supply
(1) We recommend that you always use the original power supply. Since third-party power supplies are not optimized for our products, they are likely to introduce current or other noise that will prevent the device from working properly. Ifyou have to use a third-party power supply for some reason, carefully check that the power supply specifications meet the device requirements before use.
If the original power supply is lost, check an instrument or electronics store to buy a replacement.
(2) Since our products use a three-plug power supply, before you use the device, please make sure your power outlet (including wall plugs and power strips) is properly grounded to minimize noise.
(3) If your power environment is supplying multiple devices, try using a power filter/conditioner or reducing the complexity of your power environment to minimize noise. For example, when a colleague once used Ampero and plugged in an electric heater on the same power strip, Ampero's current noise instantly increased. If you experience this problem, be careful notto plug in a large number of unrelated devices to the power outlet where you connect Ampero.
Please also note that:
(1) There has been feedback from users that Ampero has a loud current noise (or even a slight electric shock) when used alone, and that connecting the USB cable to the computer returns to normal because after connecting Ampero to the computer via a USBcable, Ampero becomes grounded via the USB cable (the computer is grounded).
(2) There are times when you experience the opposite: the original is working properly and the current sound of Ampero suddenly increases once connected to the computer, which may be interference with Ampero by the computer USB interface. At this point, try checking your computer. Even if it's a desktop computer that’s grounded, some poorly designed motherboards or computer power supplies can cause noise or even personal safety issues. If it’s a laptop you can try unplugging it to see if that helps.
(3) In some cases you may have toisolate the ground wire of the Ampero power supply; see below for details.
(4) For Ampero One users, if you need to use it frequently in complex power supply environments, we recommend that you purchase a Darkflux mobile power supply to power Ampero One to minimize the possibility of power supply noise.
(5) Effects Chain
In some connection methods, Ampero's underlying noise may increase abnormally if the effects chain is not set up properly. Note the following:
(1) When you connect Ampero totheamp Input jack, you need to turn off Ampero's AMP and CAB modules, otherwise there will be a double AMP plus double CAB. When the undertone from the instrument is amplified multiple times it will result in significant hum, and the tone will not be normal.
(2) When you connect Ampero tothe amp Return jack, you need to turn off Ampero's CAB module (which can be done in Global Settings-Inputand Output) or there will be a double CAB phenomenon, where the undertone from the instrument is amplified multiple times and causes a noticeable hum and abnormal tone.
(3) When you plug Ampero into the amp Aux In jack, you need to confirm that your amp speaker is full-frequency when using the Aux In interface, and if not, you need to turn off Ampero's CAB module (which can be done in Global Settings - Input and Output), otherwise there will be a double CAB. The undertone noiseis obvious because it is amplified multiple times, and the tone is also abnormal.
Fixed frequency noise
Ampero may experience one or more fixed-frequency noises when used with devices such as mixers with their own amplifier, tube speakers, speakers with grounded power supplies, etc., which is generally caused by the ground loop. Ground loop occurs when multiple devices are connected to a common ground via different paths. First, you'll need to verify that the device you're using uses a three-plug power cord and is properly grounded, and if so, you'll need to purchase your own three-plug, two-socket to isolate the ground wires of your Ampero power supply, or isolate the two from each other to eliminate noise from the ground loop.
Intermittent low-frequency hum
This is generally due to the threshold set by the Noise Gate in Ampero presets, which is just above the threshold. This can be adjusted as needed.
Crackling
Sometimes you hear crackling when using some high-powered instruments with Ampero or when some effect parameters are extreme, which is usually caused by an internal signal overload. We'll include input and output level indications in future firmware upgrades to indicate the signal level and whether it's overloaded to help you better adjust your tone.
Regarding the Soul Press, how many Ohms resistance is it when switched to the Expression pedal setting?
When switched to Expression mode, the the Soul Press resistance is 10k (master potentiometers:10k, trimmer potentiometer:10k).
I am using Purple Wind amp in the US but will go to the United Kingdom where the power supply is 220V instead of the 110V in the US. Can the Purple Wind handle the higher voltage?
The original power adapter of Purple Wind has a voltage range of 100-240v, so it will work fine well in the UK. You may need a plug adapter, however.
I am using Purple Wind amp in the US but will go to the United Kingdom where the power supply is 220V instead of the 110V in the US. Can the Purple Wind handle the higher voltage?
The original power adapter of Purple Wind has a voltage range of 100-240v, so it will work fine well in the UK. You may need a plug adapter, however.
I am using Purple Wind amp in the US but will go to the United Kingdom where the power supply is 220V instead of the 110V in the US. Can the Purple Wind handle the higher voltage?
The original power adapter of Purple Wind has a voltage range of 100-240v, so it will work fine well in the UK. You may need a plug adapter, however.
I am using Purple Wind amp in the US but will go to the United Kingdom where the power supply is 220V instead of the 110V in the US. Can the Purple Wind handle the higher voltage?
The original power adapter of Purple Wind has a voltage range of 100-240v, so it will work fine well in the UK. You may need a plug adapter, however.
Noise related issues
Noise problems caused by electric currents have long been a headache for many musicians. Noise issues often have complex and common causes, and many times it is normal for a certain amount of undersrance to occur after a device is powered on. The first step is to not panic. As long as the noise causes and the equipment characteristics can be understood, noise can usually be eliminated or reduced to an acceptable degree.
We collected user feedback from a number of platforms and organized a set of noise troubleshooting solutions to help you better use your audio equipment.
Before you start troubleshooting, we recommend that you upgrade your Ampero or Ampero One to the latest firmware, which you can view in your device's Global Settings menu.
As of the time this article was published, the latest firmware version information is:
Ampero Black: V3.7
Ampero Pink: V3.3B
Ampero Blue: V3.3C (factory firmware)
Ampero One: V1.1
The most current firmware releases can be found on the official website: (http://www.hotoneaudio.com/support/2).
Troubleshoot noise issues as follows:
Current noise
Current noise can be caused by the following problems:
1.Guitar electronics
(1)If you are using a single coil electric guitar, it is normal to have current noise unless the single coil pickup is a noiseless pickup.
(2)If you experience loud current noise with a dual coil or noiseless pickup, try placing your hand on the strings and then release your hand (do not touch any metal parts of the body when releasing). Observe whether the hum has changed in both states. If the hum does not change with your hand on or off the strings, the connection is probably good, and there may be a problem with the grounding of your instrument circuit.
(3)If your instrument does not have pickup wiring shielding, or if the cable shielding is not very good, when the instrument is closer to the effects box, you can try to move slightly away from the device or change the direction of the guitar. This should significantly reduce the current noise. This type of noise is caused by external electromagnetic interference.
2.Instrument cables
We strongly recommend that you use high-quality professional instrument cables, as low-quality instrument lines often introduce a large amount of noise that prevents the device from working properly. At the same time, keep your phone and other communication devices as far away from cables, speakers, and effects as possible to prevent or reduce interference.
3.Playing habits
If your instrument, device, and cable are working properly, you will notice a significant decrease or disappearance of current noise when your hand touches the strings or other metal parts. This grounds your device to reduce or eliminate noise. When you are not playing, touch the strings with your hand or turn down the volume knob.
4.Power supply
(1) We recommend that you always use the original power supply. Since third-party power supplies are not optimized for our products, they are likely to introduce current or other noise that will prevent the device from working properly. Ifyou have to use a third-party power supply for some reason, carefully check that the power supply specifications meet the device requirements before use.
If the original power supply is lost, check an instrument or electronics store to buy a replacement.
(2) Since our products use a three-plug power supply, before you use the device, please make sure your power outlet (including wall plugs and power strips) is properly grounded to minimize noise.
(3) If your power environment is supplying multiple devices, try using a power filter/conditioner or reducing the complexity of your power environment to minimize noise. For example, when a colleague once used Ampero and plugged in an electric heater on the same power strip, Ampero's current noise instantly increased. If you experience this problem, be careful notto plug in a large number of unrelated devices to the power outlet where you connect Ampero.
Please also note that:
(1) There has been feedback from users that Ampero has a loud current noise (or even a slight electric shock) when used alone, and that connecting the USB cable to the computer returns to normal because after connecting Ampero to the computer via a USBcable, Ampero becomes grounded via the USB cable (the computer is grounded).
(2) There are times when you experience the opposite: the original is working properly and the current sound of Ampero suddenly increases once connected to the computer, which may be interference with Ampero by the computer USB interface. At this point, try checking your computer. Even if it's a desktop computer that’s grounded, some poorly designed motherboards or computer power supplies can cause noise or even personal safety issues. If it’s a laptop you can try unplugging it to see if that helps.
(3) In some cases you may have toisolate the ground wire of the Ampero power supply; see below for details.
(4) For Ampero One users, if you need to use it frequently in complex power supply environments, we recommend that you purchase a Darkflux mobile power supply to power Ampero One to minimize the possibility of power supply noise.
(5) Effects Chain
In some connection methods, Ampero's underlying noise may increase abnormally if the effects chain is not set up properly. Note the following:
(1) When you connect Ampero totheamp Input jack, you need to turn off Ampero's AMP and CAB modules, otherwise there will be a double AMP plus double CAB. When the undertone from the instrument is amplified multiple times it will result in significant hum, and the tone will not be normal.
(2) When you connect Ampero tothe amp Return jack, you need to turn off Ampero's CAB module (which can be done in Global Settings-Inputand Output) or there will be a double CAB phenomenon, where the undertone from the instrument is amplified multiple times and causes a noticeable hum and abnormal tone.
(3) When you plug Ampero into the amp Aux In jack, you need to confirm that your amp speaker is full-frequency when using the Aux In interface, and if not, you need to turn off Ampero's CAB module (which can be done in Global Settings - Input and Output), otherwise there will be a double CAB. The undertone noiseis obvious because it is amplified multiple times, and the tone is also abnormal.
Fixed frequency noise
Ampero may experience one or more fixed-frequency noises when used with devices such as mixers with their own amplifier, tube speakers, speakers with grounded power supplies, etc., which is generally caused by the ground loop. Ground loop occurs when multiple devices are connected to a common ground via different paths. First, you'll need to verify that the device you're using uses a three-plug power cord and is properly grounded, and if so, you'll need to purchase your own three-plug, two-socket to isolate the ground wires of your Ampero power supply, or isolate the two from each other to eliminate noise from the ground loop.
Intermittent low-frequency hum
This is generally due to the threshold set by the Noise Gate in Ampero presets, which is just above the threshold. This can be adjusted as needed.
Crackling
Sometimes you hear crackling when using some high-powered instruments with Ampero or when some effect parameters are extreme, which is usually caused by an internal signal overload. We'll include input and output level indications in future firmware upgrades to indicate the signal level and whether it's overloaded to help you better adjust your tone.
I wish Ampero and Ampero One had more footswitches
Try using Ampero with Ampero Switch to unlock more features. Alternatively, for Ampero, you can externally connect midi controllers to expand your options. You can learn more about Ampero Switch by clicking on the link below: https://www.hotoneaudio.com/products/controlers/Ampero-switch
Can I use your Nano Legacy amps on stage? If I don't have a cab, would it be OK to connect it directly to the mixer by connecting a DI through the output?
Yes, the Nano Legacy amps works great connected directly to a mixer through the line out.
Are the Skyline pedals cases made of metal?
Yes, they are made of a heavy Zinc alloy.
What about Volume mode?
In volume mode, the pedal is high impedance and must be powered. It keeps your tone working as an active pedal.
What benefits can I have with Ampero II Stomp’s 8x8 USB audio interface?
The multi I/O USB audio interface of Ampero II Stomp brings you more possibilities when recording/mixing/monitoring/mastering your music compositions including:
● Set chain A/B to fully parallel, add different effects – recording with two different tones
● Record two instruments at the same time
● Record dry and wet signal at the same time
● Reamp
● … and more!
You can also have some alternative usages like:
● Use FX Loop Return jack as an aux input for recording from other devices
● Use FX Loop Send jack as an aux output for separate monitoring
● Go streaming or online teaching with broadcaster app (e.g. OBS)
● … and more!
We'll give more features for optimizing the USB audio function like higher sampling rate and loopback function so that you can explore much more.
Do I need to always connect my mobile phone to use it?
Once you are done with all the editing and have saved the presets to your Ampero Control, you can just use it without your mobile phone. All the contents are stored inside the device and all you need to do is to power it up.
I wish Ampero and Ampero One had more footswitches
Try using Ampero with Ampero Switch to unlock more features. Alternatively, for Ampero, you can externally connect midi controllers to expand your options. You can learn more about Ampero Switch by clicking on the link below: https://www.hotoneaudio.com/products/controlers/Ampero-switch
What about Volume mode?
In volume mode, the pedal is high impedance and must be powered. It keeps your tone working as an active pedal.
Can I use your Nano Legacy amps on stage? If I don't have a cab, would it be OK to connect it directly to the mixer by connecting a DI through the output?
Yes, the Nano Legacy amps works great connected directly to a mixer through the line out.
Can I use your Nano Legacy amps on stage? If I don't have a cab, would it be OK to connect it directly to the mixer by connecting a DI through the output?
Yes, the Nano Legacy amps works great connected directly to a mixer through the line out.
Can I use your Nano Legacy amps on stage? If I don't have a cab, would it be OK to connect it directly to the mixer by connecting a DI through the output?
Yes, the Nano Legacy amps works great connected directly to a mixer through the line out.
Can I use your Nano Legacy amps on stage? If I don't have a cab, would it be OK to connect it directly to the mixer by connecting a DI through the output?
Yes, the Nano Legacy amps works great connected directly to a mixer through the line out.
I wish Ampero and Ampero One had more footswitches
Try using Ampero with Ampero Switch to unlock more features. Alternatively, for Ampero, you can externally connect midi controllers to expand your options. You can learn more about Ampero Switch by clicking on the link below: https://www.hotoneaudio.com/products/controlers/Ampero-switch
What are the power requirements for Ampero, and Ampero One? If my original power supply is accidentally lost, how do I choose the right power supply?
We recommend that you always use the original power supply. Third-party power supplies are not designed for our products any may introduce current noise or other noise, resulting in the device is not working properly.
If you have to use a third-party power supply for some reason, choose a power supply based on your device that meets the following specifications:
Ampero: DC 18V internal and external positive power supply, output current needs to be greater than 500mA, AC end plug requires ground connector; DC end plug size: 5.5mm X 2.1mm
Ampero One: DC 9V internal and external positive power supply with output current greater than 500mA and DC end plug size: 5.5mm X 2.1mm
As a mini amplifier, could the Nano Legacy Amplifier work with large cabinets?
Yes, Hotone Nano Legacy series Amplifier has adaptive impedance matching from 4 Ohm to 16 Ohm cabinets, with an output power of 5 watts.
Can the Skyline Tuner be powered with 18V?
Skyline tuner CAN NOT work with an 18v power supply. The internal circuit would be destroyed under over high voltage. Please use a standard 9v power supply.
When I’m using Ampero II Stomp as an audio interface, how can I record backing track and my instruments at the same time?
The Aux In input of Ampero II Stomp will not be processed, but you can use FX Loop Return jack instead by following the steps below:
1. Connect your Ampero II Stomp to your computer as an audio interface.
2. Launch a DAW and set Ampero II Stomp as the main audio device.
3. Create an audio track (track A) with stereo input, set input channel to 1-2 for recording instruments.
4. Create an audio track (track B) with stereo input, set input channel to 5-6 for recording external backing track.
5. Connect backing track player to Ampero II Stomp with an aux cable (audio jack adapters may be needed depending on your cable).
6. Record both track A and B to record your instruments and backing track at the same time.
If you want to get a mixed track instead of separated tracks, please follow the steps below:
1. Connect your Ampero II Stomp to your computer as an audio interface.
2. Launch a DAW and set Ampero II Stomp as the main audio device.
3. Create an audio track with stereo input, set input channel to 1-2 for recording.
4. Add an FX RTN module in the current patch, keep all settings as default; this module should be added to the VERY END of your effect chain (before output node A).
5. Connect backing track player to Ampero II Stomp with an aux cable (audio jack adapters may be needed depending on your cable).
6. Record the audio track you created to get an audio clip mixing instrument and backing track.
What is Test?
You must have noticed the button Test in the editing page. What the “Test” button let you do is to ask the Ampero Control to send out the current group of message you are editing. The messages are not stored and the preset is not modified. This will allow you to verify the messages before you actually store it.
What are the power requirements for Ampero, and Ampero One? If my original power supply is accidentally lost, how do I choose the right power supply?
We recommend that you always use the original power supply. Third-party power supplies are not designed for our products any may introduce current noise or other noise, resulting in the device is not working properly.
If you have to use a third-party power supply for some reason, choose a power supply based on your device that meets the following specifications:
Ampero: DC 18V internal and external positive power supply, output current needs to be greater than 500mA, AC end plug requires ground connector; DC end plug size: 5.5mm X 2.1mm
Ampero One: DC 9V internal and external positive power supply with output current greater than 500mA and DC end plug size: 5.5mm X 2.1mm
As a mini amplifier, could the Nano Legacy Amplifier work with large cabinets?
Yes, Hotone Nano Legacy series Amplifier has adaptive impedance matching from 4 Ohm to 16 Ohm cabinets, with an output power of 5 watts.
As a mini amplifier, could the Nano Legacy Amplifier work with large cabinets?
Yes, Hotone Nano Legacy series Amplifier has adaptive impedance matching from 4 Ohm to 16 Ohm cabinets, with an output power of 5 watts.
As a mini amplifier, could the Nano Legacy Amplifier work with large cabinets?
Yes, Hotone Nano Legacy series Amplifier has adaptive impedance matching from 4 Ohm to 16 Ohm cabinets, with an output power of 5 watts.
As a mini amplifier, could the Nano Legacy Amplifier work with large cabinets?
Yes, Hotone Nano Legacy series Amplifier has adaptive impedance matching from 4 Ohm to 16 Ohm cabinets, with an output power of 5 watts.
As a mini amplifier, could the Nano Legacy Amplifier work with large cabinets?
Yes, Hotone Nano Legacy series Amplifier has adaptive impedance matching from 4 Ohm to 16 Ohm cabinets, with an output power of 5 watts.
What are the power requirements for Ampero, and Ampero One? If my original power supply is accidentally lost, how do I choose the right power supply?
We recommend that you always use the original power supply. Third-party power supplies are not designed for our products any may introduce current noise or other noise, resulting in the device is not working properly.
If you have to use a third-party power supply for some reason, choose a power supply based on your device that meets the following specifications:
Ampero: DC 18V internal and external positive power supply, output current needs to be greater than 500mA, AC end plug requires ground connector; DC end plug size: 5.5mm X 2.1mm
Ampero One: DC 9V internal and external positive power supply with output current greater than 500mA and DC end plug size: 5.5mm X 2.1mm
How do I download the latest version of firmware and software?
First, please visit the support page of Hotone's official website: (https://www.hotoneaudio.com/support/1):
Then, find the firmware or software options in the left column. When you click on it, the right column will display the available updates:
You can type keywords to search, or you can manually select product categories (multieffects) and product names (Ampero or Ampero One; note that Ampero has several different versions) to filter the firmware or software you need.
The higher the number of the version, the newer the software/firmware.
On the Mojo Diamond amp the line/headphones out on the back is listed on the specs as a stereo mini jack. Will it be damaged if I use a mono jack instead, to connect it to the mono line-in of outboard gear or power-amps or mixers?
It's fine to connect the line/headphones output with a mono jack.
How to use the MIDI IN socket
First of all, the MIDI OUT socket on Ampero Control is also a MIDI Thru socket. The MIDI messages that Ampero Control receives from either MIDI IN, Bluetooth MIDI or USB MIDI will be forwarded to the MIDI OUT socket. So there are two major reasons that you would use the MIDI IN socket.
The first one is to connect multiple Ampero Control together so you can have more than 4 footswitches. Just connect Ampero Control in a daisy chain style by plugging MIDI cable between MIDI IN socket on one device to MIDI OUT socket on another one.
The second one is to allow you to put Ampero Control in the middle of your MIDI message chain instead of only at the beginning of the message chain.
How do I download the latest version of firmware and software?
First, please visit the support page of Hotone's official website: (https://www.hotoneaudio.com/support/1):
Then, find the firmware or software options in the left column. When you click on it, the right column will display the available updates:
You can type keywords to search, or you can manually select product categories (multieffects) and product names (Ampero or Ampero One; note that Ampero has several different versions) to filter the firmware or software you need.
The higher the number of the version, the newer the software/firmware.
On the Mojo Diamond amp the line/headphones out on the back is listed on the specs as a stereo mini jack. Will it be damaged if I use a mono jack instead, to connect it to the mono line-in of outboard gear or power-amps or mixers?
It's fine to connect the line/headphones output with a mono jack.
On the Mojo Diamond amp the line/headphones out on the back is listed on the specs as a stereo mini jack. Will it be damaged if I use a mono jack instead, to connect it to the mono line-in of outboard gear or power-amps or mixers?
It's fine to connect the line/headphones output with a mono jack.
On the Mojo Diamond amp the line/headphones out on the back is listed on the specs as a stereo mini jack. Will it be damaged if I use a mono jack instead, to connect it to the mono line-in of outboard gear or power-amps or mixers?
It's fine to connect the line/headphones output with a mono jack.
On the Mojo Diamond amp the line/headphones out on the back is listed on the specs as a stereo mini jack. Will it be damaged if I use a mono jack instead, to connect it to the mono line-in of outboard gear or power-amps or mixers?
It's fine to connect the line/headphones output with a mono jack.
How do I download the latest version of firmware and software?
First, please visit the support page of Hotone's official website: (https://www.hotoneaudio.com/support/1):
Then, find the firmware or software options in the left column. When you click on it, the right column will display the available updates:
You can type keywords to search, or you can manually select product categories (multieffects) and product names (Ampero or Ampero One; note that Ampero has several different versions) to filter the firmware or software you need.
The higher the number of the version, the newer the software/firmware.
What happens to the IRs of Ampero and Ampero One?
Ampero, like Ampero One, supports 1024 IR sampling, which is approximately 23ms in length. That is, no matter how long the user's IR file is, Ampero will only take the first 23ms of content, and if the user's IR file length is less than this value, it will be processed at the actual length.
What are the power requirements for the Nano Legacy amps? And how much current do they draw?
The Nano Legacy amps works with 18V with a maximum output current of 900mA (at 18V 4Ohm).
Can I send MIDI messages to Ampero Control through USB and Bluetooth?
Yes you can send MIDI messages to Ampero Control either through USB MIDI and Bluetooth MIDI. All the received messages will be sent out untouched through MIDI OUT socket.
What happens to the IRs of Ampero and Ampero One?
Ampero, like Ampero One, supports 1024 IR sampling, which is approximately 23ms in length. That is, no matter how long the user's IR file is, Ampero will only take the first 23ms of content, and if the user's IR file length is less than this value, it will be processed at the actual length.
What are the power requirements for the Nano Legacy amps? And how much current do they draw?
The Nano Legacy amps works with 18V with a maximum output current of 900mA (at 18V 4Ohm).
What are the power requirements for the Nano Legacy amps? And how much current do they draw?
The Nano Legacy amps works with 18V with a maximum output current of 900mA (at 18V 4Ohm).
What are the power requirements for the Nano Legacy amps? And how much current do they draw?
The Nano Legacy amps works with 18V with a maximum output current of 900mA (at 18V 4Ohm).
What are the power requirements for the Nano Legacy amps? And how much current do they draw?
The Nano Legacy amps works with 18V with a maximum output current of 900mA (at 18V 4Ohm).
What happens to the IRs of Ampero and Ampero One?
Ampero, like Ampero One, supports 1024 IR sampling, which is approximately 23ms in length. That is, no matter how long the user's IR file is, Ampero will only take the first 23ms of content, and if the user's IR file length is less than this value, it will be processed at the actual length.
Why do the effects parameters I'm using jump around without me changing them?
Check in the control settings interface whether the effect parameters moving around are controlled by the built-in or external expression pedal. If you do not need the parameters to be controlled by the expression pedal, they can be cleared from the control items linked to the expression pedal.
In addition, if you use a built-in or external expression pedal to control a parameter, when your pedal stays in the middle tread position, the controlled parameters may move within a very small range, because the host may detect slight changes in pedal travel, which is normal. If it’s influenced by the beat, for example, the movement range depends on the pedal's angle or pedal electronics accuracy.
Can the Nano Legacy series be run without a speaker (using the headphone out to a speaker emulator box then to the PA).
The Nano Legacy heads don't need a speaker load to function, so you can certainly just use it with headphones. They also work great directly through an interface for computer recording.
Why do the effects parameters I'm using jump around without me changing them?
Check in the control settings interface whether the effect parameters moving around are controlled by the built-in or external expression pedal. If you do not need the parameters to be controlled by the expression pedal, they can be cleared from the control items linked to the expression pedal.
In addition, if you use a built-in or external expression pedal to control a parameter, when your pedal stays in the middle tread position, the controlled parameters may move within a very small range, because the host may detect slight changes in pedal travel, which is normal. If it’s influenced by the beat, for example, the movement range depends on the pedal's angle or pedal electronics accuracy.
Can the Nano Legacy series be run without a speaker (using the headphone out to a speaker emulator box then to the PA).
The Nano Legacy heads don't need a speaker load to function, so you can certainly just use it with headphones. They also work great directly through an interface for computer recording.
Can the Nano Legacy series be run without a speaker (using the headphone out to a speaker emulator box then to the PA).
The Nano Legacy heads don't need a speaker load to function, so you can certainly just use it with headphones. They also work great directly through an interface for computer recording.
Can the Nano Legacy series be run without a speaker (using the headphone out to a speaker emulator box then to the PA).
The Nano Legacy heads don't need a speaker load to function, so you can certainly just use it with headphones. They also work great directly through an interface for computer recording.
Can the Nano Legacy series be run without a speaker (using the headphone out to a speaker emulator box then to the PA).
The Nano Legacy heads don't need a speaker load to function, so you can certainly just use it with headphones. They also work great directly through an interface for computer recording.
Why do the effects parameters I'm using jump around without me changing them?
Check in the control settings interface whether the effect parameters moving around are controlled by the built-in or external expression pedal. If you do not need the parameters to be controlled by the expression pedal, they can be cleared from the control items linked to the expression pedal.
In addition, if you use a built-in or external expression pedal to control a parameter, when your pedal stays in the middle tread position, the controlled parameters may move within a very small range, because the host may detect slight changes in pedal travel, which is normal. If it’s influenced by the beat, for example, the movement range depends on the pedal's angle or pedal electronics accuracy.
How do I make a firmware update?
See the Firmware Update Guide on the official website.
Can you tell me if the effects loop is –10dBV for pedals or +4dBV for rack units?
The Nano Legacy amp FX loop is designed for -10dBV (instrument level). However, because the volume knob (LEVEL) is before the SEND in terms of circuitry, you can increase the SEND out signal a bit by turning up the level. It may not get up to +4dbV, but it should be enough to drive most rack equipment.
How do I make a firmware update?
See the Firmware Update Guide on the official website.
Can you tell me if the effects loop is –10dBV for pedals or +4dBV for rack units?
The Nano Legacy amp FX loop is designed for -10dBV (instrument level). However, because the volume knob (LEVEL) is before the SEND in terms of circuitry, you can increase the SEND out signal a bit by turning up the level. It may not get up to +4dbV, but it should be enough to drive most rack equipment.
Can you tell me if the effects loop is –10dBV for pedals or +4dBV for rack units?
The Nano Legacy amp FX loop is designed for -10dBV (instrument level). However, because the volume knob (LEVEL) is before the SEND in terms of circuitry, you can increase the SEND out signal a bit by turning up the level. It may not get up to +4dbV, but it should be enough to drive most rack equipment.
Can you tell me if the effects loop is –10dBV for pedals or +4dBV for rack units?
The Nano Legacy amp FX loop is designed for -10dBV (instrument level). However, because the volume knob (LEVEL) is before the SEND in terms of circuitry, you can increase the SEND out signal a bit by turning up the level. It may not get up to +4dbV, but it should be enough to drive most rack equipment.
Can you tell me if the effects loop is –10dBV for pedals or +4dBV for rack units?
The Nano Legacy amp FX loop is designed for -10dBV (instrument level). However, because the volume knob (LEVEL) is before the SEND in terms of circuitry, you can increase the SEND out signal a bit by turning up the level. It may not get up to +4dbV, but it should be enough to drive most rack equipment.
How do I make a firmware update?
See the Firmware Update Guide on the official website.
How do I import/export presets on Ampero/Ampero One?
Connect Ampero/Ampero One to your computer, open the Ampero Editor editing software on your PC, click "Import" or "Export" in the upper right corner of the software interface. Files will feature the preset extension suffix, "prst."
After the import is successful, the first preset of User Presets will automatically become the preset you imported, and as you continue to add presets, you will need to select the User Presets column (click on the original preset you want to replace) and then import.
Are these amps solid state or digital?
The amp heads are 100% analog solid state.
How do I import/export presets on Ampero/Ampero One?
Connect Ampero/Ampero One to your computer, open the Ampero Editor editing software on your PC, click "Import" or "Export" in the upper right corner of the software interface. Files will feature the preset extension suffix, "prst."
After the import is successful, the first preset of User Presets will automatically become the preset you imported, and as you continue to add presets, you will need to select the User Presets column (click on the original preset you want to replace) and then import.
Are these amps solid state or digital?
The amp heads are 100% analog solid state.
Are these amps solid state or digital?
The amp heads are 100% analog solid state.
Are these amps solid state or digital?
The amp heads are 100% analog solid state.
Are these amps solid state or digital?
The amp heads are 100% analog solid state.
How do I import/export presets on Ampero/Ampero One?
Connect Ampero/Ampero One to your computer, open the Ampero Editor editing software on your PC, click "Import" or "Export" in the upper right corner of the software interface. Files will feature the preset extension suffix, "prst."
After the import is successful, the first preset of User Presets will automatically become the preset you imported, and as you continue to add presets, you will need to select the User Presets column (click on the original preset you want to replace) and then import.
How do I import a third-party IR file in Ampero/Ampero One?
Connect Ampero/Ampero One to your computer, open the Ampero Editor editing software on your computer, click on the CAB module in the software interface effect chain, click "Import IR Files" next to the effects list, and select an IR file (WAV format) to import.
Ampero/Ampero One provides ten blank IR locations. Remember to not overwrite previously imported IR files when importing new IR files.
The question I have is, can I run a multi effects pedal straight into the F/X return? I want to be able to by-pass the preamp without damaging the unit.
Sure can, that's what the FX loop is for. Remember to turn off the amp modeling on the multi-effects when you're using it with the Nano Legacy amp.
How do I import a third-party IR file in Ampero/Ampero One?
Connect Ampero/Ampero One to your computer, open the Ampero Editor editing software on your computer, click on the CAB module in the software interface effect chain, click "Import IR Files" next to the effects list, and select an IR file (WAV format) to import.
Ampero/Ampero One provides ten blank IR locations. Remember to not overwrite previously imported IR files when importing new IR files.
The question I have is, can I run a multi effects pedal straight into the F/X return? I want to be able to by-pass the preamp without damaging the unit.
Sure can, that's what the FX loop is for. Remember to turn off the amp modeling on the multi-effects when you're using it with the Nano Legacy amp.
The question I have is, can I run a multi effects pedal straight into the F/X return? I want to be able to by-pass the preamp without damaging the unit.
Sure can, that's what the FX loop is for. Remember to turn off the amp modeling on the multi-effects when you're using it with the Nano Legacy amp.
The question I have is, can I run a multi effects pedal straight into the F/X return? I want to be able to by-pass the preamp without damaging the unit.
Sure can, that's what the FX loop is for. Remember to turn off the amp modeling on the multi-effects when you're using it with the Nano Legacy amp.
The question I have is, can I run a multi effects pedal straight into the F/X return? I want to be able to by-pass the preamp without damaging the unit.
Sure can, that's what the FX loop is for. Remember to turn off the amp modeling on the multi-effects when you're using it with the Nano Legacy amp.
How do I import a third-party IR file in Ampero/Ampero One?
Connect Ampero/Ampero One to your computer, open the Ampero Editor editing software on your computer, click on the CAB module in the software interface effect chain, click "Import IR Files" next to the effects list, and select an IR file (WAV format) to import.
Ampero/Ampero One provides ten blank IR locations. Remember to not overwrite previously imported IR files when importing new IR files.
How do I adjust the Ampero/Ampero One pedal?
Consider recalibrating the expression pedal if the effect changes significantly when you use it or when you press the pedal lightly.
Click Control Settings - Expression Pedal 1 Settings – Calibrate, and calibrate as prompted.
The expression pedal 1 is the built-in pedal and expression pedal 2 is the external pedal.
I just bought the British Invasion and the Nano Legacy Cabinet. Just want to know the maximum number of Nano Legacy cabinets that can be hooked up?
The OUTPUT of Nano Legacy Cabinet is designed for connecting another cab in parallel; when you are using 2 Nano Legacy Cabs, the overall impedance will become to 4Ω.
If you can DIY the circuit in series and in parallel simultaneously, as long as the overall impedance is not lower than 4Ω, in theory, you can connect as many extra cabs as as you want.
How do I adjust the Ampero/Ampero One pedal?
Consider recalibrating the expression pedal if the effect changes significantly when you use it or when you press the pedal lightly.
Click Control Settings - Expression Pedal 1 Settings – Calibrate, and calibrate as prompted.
The expression pedal 1 is the built-in pedal and expression pedal 2 is the external pedal.
I just bought the British Invasion and the Nano Legacy Cabinet. Just want to know the maximum number of Nano Legacy cabinets that can be hooked up?
The OUTPUT of Nano Legacy Cabinet is designed for connecting another cab in parallel; when you are using 2 Nano Legacy Cabs, the overall impedance will become to 4Ω.
If you can DIY the circuit in series and in parallel simultaneously, as long as the overall impedance is not lower than 4Ω, in theory, you can connect as many extra cabs as as you want.
I just bought the British Invasion and the Nano Legacy Cabinet. Just want to know the maximum number of Nano Legacy cabinets that can be hooked up?
The OUTPUT of Nano Legacy Cabinet is designed for connecting another cab in parallel; when you are using 2 Nano Legacy Cabs, the overall impedance will become to 4Ω.
If you can DIY the circuit in series and in parallel simultaneously, as long as the overall impedance is not lower than 4Ω, in theory, you can connect as many extra cabs as as you want.
I just bought the British Invasion and the Nano Legacy Cabinet. Just want to know the maximum number of Nano Legacy cabinets that can be hooked up?
The OUTPUT of Nano Legacy Cabinet is designed for connecting another cab in parallel; when you are using 2 Nano Legacy Cabs, the overall impedance will become to 4Ω.
If you can DIY the circuit in series and in parallel simultaneously, as long as the overall impedance is not lower than 4Ω, in theory, you can connect as many extra cabs as as you want.
I just bought the British Invasion and the Nano Legacy Cabinet. Just want to know the maximum number of Nano Legacy cabinets that can be hooked up?
The OUTPUT of Nano Legacy Cabinet is designed for connecting another cab in parallel; when you are using 2 Nano Legacy Cabs, the overall impedance will become to 4Ω.
If you can DIY the circuit in series and in parallel simultaneously, as long as the overall impedance is not lower than 4Ω, in theory, you can connect as many extra cabs as as you want.
How do I adjust the Ampero/Ampero One pedal?
Consider recalibrating the expression pedal if the effect changes significantly when you use it or when you press the pedal lightly.
Click Control Settings - Expression Pedal 1 Settings – Calibrate, and calibrate as prompted.
The expression pedal 1 is the built-in pedal and expression pedal 2 is the external pedal.
How do I use the expression pedal on Ampero/Ampero One?
First, activate the expression pedal (the default is the volume pedal when not activated). Press the pedal hard to enter the expression pedal function.
Second, click Control Settings - Expression Pedal 1 Settings - Control Object, and select the target module, target effect, and target parameters in the parameter bar.
In the case of wah effects, when using the expression pedal as a wah pedal, you first need to add the wah effect to the FX1 or FX2 module of the signal chain and assign the Range parameter to the expression pedal, at which point you can hear the effect by turning on and using the expression pedal.
How do I use the expression pedal on Ampero/Ampero One?
First, activate the expression pedal (the default is the volume pedal when not activated). Press the pedal hard to enter the expression pedal function.
Second, click Control Settings - Expression Pedal 1 Settings - Control Object, and select the target module, target effect, and target parameters in the parameter bar.
In the case of wah effects, when using the expression pedal as a wah pedal, you first need to add the wah effect to the FX1 or FX2 module of the signal chain and assign the Range parameter to the expression pedal, at which point you can hear the effect by turning on and using the expression pedal.
How do I use the expression pedal on Ampero/Ampero One?
First, activate the expression pedal (the default is the volume pedal when not activated). Press the pedal hard to enter the expression pedal function.
Second, click Control Settings - Expression Pedal 1 Settings - Control Object, and select the target module, target effect, and target parameters in the parameter bar.
In the case of wah effects, when using the expression pedal as a wah pedal, you first need to add the wah effect to the FX1 or FX2 module of the signal chain and assign the Range parameter to the expression pedal, at which point you can hear the effect by turning on and using the expression pedal.
How do different instruments connect to Ampero/Ampero One?
Ampero has three input options for different instruments:
1. E.GT: For electric guitar/electric bass
2. A.GT: For acoustic guitar or any acoustic instrument
3. LINE: For keyboard instruments such as electric piano, synths, etc.
Ampero One reduces the instrument input selection switch design, but it has a special input interface with extremely high input impedance (up to 4.7M Ohms), which can handle all kinds of instruments. As a result, Ampero One does not need any input adjustment and can be used with electric guitars, electric bass, and acoustic and keyboard instruments.
How do different instruments connect to Ampero/Ampero One?
Ampero has three input options for different instruments:
1. E.GT: For electric guitar/electric bass
2. A.GT: For acoustic guitar or any acoustic instrument
3. LINE: For keyboard instruments such as electric piano, synths, etc.
Ampero One reduces the instrument input selection switch design, but it has a special input interface with extremely high input impedance (up to 4.7M Ohms), which can handle all kinds of instruments. As a result, Ampero One does not need any input adjustment and can be used with electric guitars, electric bass, and acoustic and keyboard instruments.
How do different instruments connect to Ampero/Ampero One?
Ampero has three input options for different instruments:
1. E.GT: For electric guitar/electric bass
2. A.GT: For acoustic guitar or any acoustic instrument
3. LINE: For keyboard instruments such as electric piano, synths, etc.
Ampero One reduces the instrument input selection switch design, but it has a special input interface with extremely high input impedance (up to 4.7M Ohms), which can handle all kinds of instruments. As a result, Ampero One does not need any input adjustment and can be used with electric guitars, electric bass, and acoustic and keyboard instruments.
When do I need to turn the Cab module on/off for Ampero/Ampero One, and how does No Cab mode turn on?
When you connect Ampero/Ampero One to the amp Input, we recommend that you turn off Ampero's AMP and CAB modules for best results.
We recommend that you turn off Ampero's CAB module to avoid adverse effects to tone when connecting Ampero the amp RETURN jack or the input of a power amp, such as Loudster.
When you connect Ampero/Ampero One to full-frequency audio devices such as mixers, audio interfaces, headphones, etc., we recommend that you turn on Ampero/Ampero One's AMP and CAB modules for best results.
In global settings, you can turn on No Cab so that the cabinet effect remains turned off when you switch presets. Method: Global settings - In/Out - Page-turning – No Cab mode (left/right) - Select Off/On
When you connect only one speaker or produce a mono output signal, we recommend that you prioritize the left channel output interface of Ampero/Ampero One.
When do I need to turn the Cab module on/off for Ampero/Ampero One, and how does No Cab mode turn on?
When you connect Ampero/Ampero One to the amp Input, we recommend that you turn off Ampero's AMP and CAB modules for best results.
We recommend that you turn off Ampero's CAB module to avoid adverse effects to tone when connecting Ampero the amp RETURN jack or the input of a power amp, such as Loudster.
When you connect Ampero/Ampero One to full-frequency audio devices such as mixers, audio interfaces, headphones, etc., we recommend that you turn on Ampero/Ampero One's AMP and CAB modules for best results.
In global settings, you can turn on No Cab so that the cabinet effect remains turned off when you switch presets. Method: Global settings - In/Out - Page-turning – No Cab mode (left/right) - Select Off/On
When you connect only one speaker or produce a mono output signal, we recommend that you prioritize the left channel output interface of Ampero/Ampero One.
When do I need to turn the Cab module on/off for Ampero/Ampero One, and how does No Cab mode turn on?
When you connect Ampero/Ampero One to the amp Input, we recommend that you turn off Ampero's AMP and CAB modules for best results.
We recommend that you turn off Ampero's CAB module to avoid adverse effects to tone when connecting Ampero the amp RETURN jack or the input of a power amp, such as Loudster.
When you connect Ampero/Ampero One to full-frequency audio devices such as mixers, audio interfaces, headphones, etc., we recommend that you turn on Ampero/Ampero One's AMP and CAB modules for best results.
In global settings, you can turn on No Cab so that the cabinet effect remains turned off when you switch presets. Method: Global settings - In/Out - Page-turning – No Cab mode (left/right) - Select Off/On
When you connect only one speaker or produce a mono output signal, we recommend that you prioritize the left channel output interface of Ampero/Ampero One.
How is Global EQ setup?
Global EQ is used to set the overall equalization on Ampero. You can access this in the Global Settings of the Ampero/Ampero One main interface, or in the Ampero Editor editing software (icon is located to the right of the drum machine speed).
Global EQ changes Ampero's overall tone, and the Switch option switches the global EQ on (which is turned off by default). Low frequency/high frequency points and low frequency/high frequency gain are used to set the frequency and gain of the low frequency/high frequency shelf filter. The mid frequency point and mid frequency bandwidth are used to set the midrange frequency point and bandwidth (Q value, range 0.1-10, the larger the number, the narrower the bandwidth). The mi frequency gain is used to set the gain of the MID filter. Volume is used to set the output volume, which ranges from 0-100 (default setting is 50).
All frequency and gain adjustments have the same range:
Frequency adjustment range: 20Hz-999Hz (1Hz per step), -1.0kHz-20.0kHz (0.1kHz per step).
Gain adjustment range: -12dB to +12dB
How is Global EQ setup?
Global EQ is used to set the overall equalization on Ampero. You can access this in the Global Settings of the Ampero/Ampero One main interface, or in the Ampero Editor editing software (icon is located to the right of the drum machine speed).
Global EQ changes Ampero's overall tone, and the Switch option switches the global EQ on (which is turned off by default). Low frequency/high frequency points and low frequency/high frequency gain are used to set the frequency and gain of the low frequency/high frequency shelf filter. The mid frequency point and mid frequency bandwidth are used to set the midrange frequency point and bandwidth (Q value, range 0.1-10, the larger the number, the narrower the bandwidth). The mi frequency gain is used to set the gain of the MID filter. Volume is used to set the output volume, which ranges from 0-100 (default setting is 50).
All frequency and gain adjustments have the same range:
Frequency adjustment range: 20Hz-999Hz (1Hz per step), -1.0kHz-20.0kHz (0.1kHz per step).
Gain adjustment range: -12dB to +12dB
How is Global EQ setup?
Global EQ is used to set the overall equalization on Ampero. You can access this in the Global Settings of the Ampero/Ampero One main interface, or in the Ampero Editor editing software (icon is located to the right of the drum machine speed).
Global EQ changes Ampero's overall tone, and the Switch option switches the global EQ on (which is turned off by default). Low frequency/high frequency points and low frequency/high frequency gain are used to set the frequency and gain of the low frequency/high frequency shelf filter. The mid frequency point and mid frequency bandwidth are used to set the midrange frequency point and bandwidth (Q value, range 0.1-10, the larger the number, the narrower the bandwidth). The mi frequency gain is used to set the gain of the MID filter. Volume is used to set the output volume, which ranges from 0-100 (default setting is 50).
All frequency and gain adjustments have the same range:
Frequency adjustment range: 20Hz-999Hz (1Hz per step), -1.0kHz-20.0kHz (0.1kHz per step).
Gain adjustment range: -12dB to +12dB
How do I record audio using Ampero?
Record audio with your phone: Use an OTG cable to connect your phone to Ampero/Ampero One, turn on recording on your phone, or tap record on your video app.
Record with an external audio interface: Connect the output of Ampero/Ampero One to the input of the external audio interface, turn on your DAW (Pro Tools, StudioOne, etc.) to select an external audio interface in the audio hardware options, and tap Record to record. Using Ampero/Ampero One as the audio interface: Download and install the Hotone USB ASIO driver V5.0.0 from the official website. Connect Ampero/Ampero One to your computer, turn on your DAW, selects "Ampero Audio" in the audio hardware option, and click Record to begin recording.
How do I record audio using Ampero?
Record audio with your phone: Use an OTG cable to connect your phone to Ampero/Ampero One, turn on recording on your phone, or tap record on your video app.
Record with an external audio interface: Connect the output of Ampero/Ampero One to the input of the external audio interface, turn on your DAW (Pro Tools, StudioOne, etc.) to select an external audio interface in the audio hardware options, and tap Record to record. Using Ampero/Ampero One as the audio interface: Download and install the Hotone USB ASIO driver V5.0.0 from the official website. Connect Ampero/Ampero One to your computer, turn on your DAW, selects "Ampero Audio" in the audio hardware option, and click Record to begin recording.
How do I record audio using Ampero?
Record audio with your phone: Use an OTG cable to connect your phone to Ampero/Ampero One, turn on recording on your phone, or tap record on your video app.
Record with an external audio interface: Connect the output of Ampero/Ampero One to the input of the external audio interface, turn on your DAW (Pro Tools, StudioOne, etc.) to select an external audio interface in the audio hardware options, and tap Record to record. Using Ampero/Ampero One as the audio interface: Download and install the Hotone USB ASIO driver V5.0.0 from the official website. Connect Ampero/Ampero One to your computer, turn on your DAW, selects "Ampero Audio" in the audio hardware option, and click Record to begin recording.

Hotone AI Customer Service
close

Hello! I am Hotone AI Customer Service. How can I help you?